# CATÁLOGO DE SERVIÇOS - GLPI
A prestação do suporte técnico a que se refere este documento fica a cargo da Central de Serviços de TI, ponto de contato entre o provedor de serviço e os usuários. É função da Central de Serviços gerenciar incidentes, requisições de serviço e também a comunicação com os usuários.
# Como Gerenciar Chamados no GLPI
Sumário
Diferença entre “requisição” e “incidente”
Tela Inicial do GLPI
Identificado os seus chamados
Informações de um chamado
Inserindo notas no chamado
Pedindo aprovação para atender chamado
Solucionando um chamado
Enviando tarefas para um colega, a partir de um chamado
Consultar chamados
Criar um chamado para terceiros
Informações gerais
Processo de controle e configuração das câmeras e switchs no GLPI & Zabbix
1 - Diferença entre “requisição” e “incidente”
No GLPI há dois tipos de chamados (incidente e requisição):
- Incidente é um evento que não seja parte da operação padrão de um serviço e que causa, ou pode causar, uma interrupção ou redução na qualidade daquele serviço.
- Requisição é uma solicitação para alterar alguma configuração em relação a um serviço de TI, tais como: troca de senha, concessão de direitos de acesso lógico, criação de um site, manutenção de um computador, etc.
#### 2 - Tela Inicial do GLPI

#### 3 - Identificado os seus chamados
Para atender um chamado no GLPI basta acessar a seção “chamados a serem processados”, na tela inicial. As tarefas de um chamado podem ser acessadas na seção “tarefas de chamado para fazer”, quando alguém associa uma tarefa a você. Para acessar o chamado basta acionar o link da coluna descrição, como ilustrado da imagem a seguir:

#### 4 - Informações de um chamado
Na aba “chamado” os atendentes podem editar informações de um chamado específico, enquanto o chamado não estiver solucionado, como pode ser visto na imagem a seguir. Dois detalhes devem ser verificados no atendimento dos chamados: “Tipo” e “Categoria”. Em relação ao “Tipo” deve ser verificado se o chamado do chamado está de acordo com o tipo do chamado (requisição ou incidente). Já em relação a “Categoria” deve ser verificado se a categoria do chamado corresponde com o conteúdo do chamado. Essa verificação é feita para manter uma catalogação fiel dos chamados, pois serão utilizados em indicadores e mensurações de atendimentos.
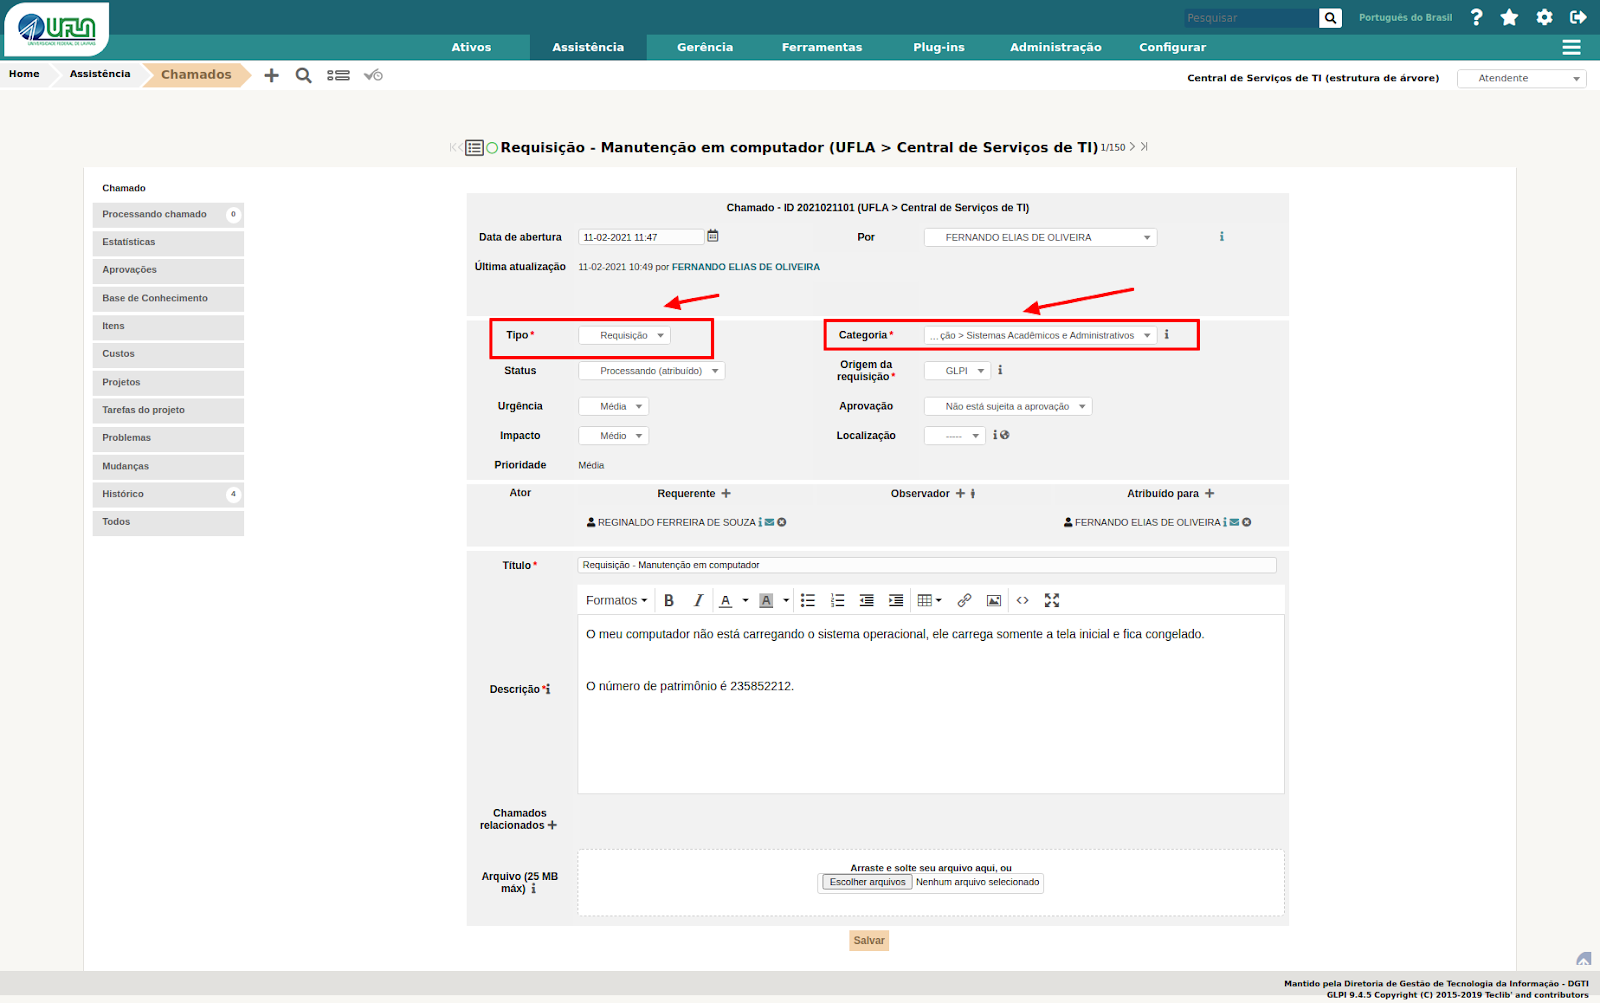
É possível atribuir um chamado para um atendente da DGTI por meio do campo “Atribuído para +” e inserir qualquer pessoa para observar o chamado (em “Observador por +”), veja na imagem a seguir:

IMPORTANTE: No GLPI, o solicitante é tratado como “Requerente” e o atendente é um “Técnico”.
#### 5 - Inserindo notas no chamado
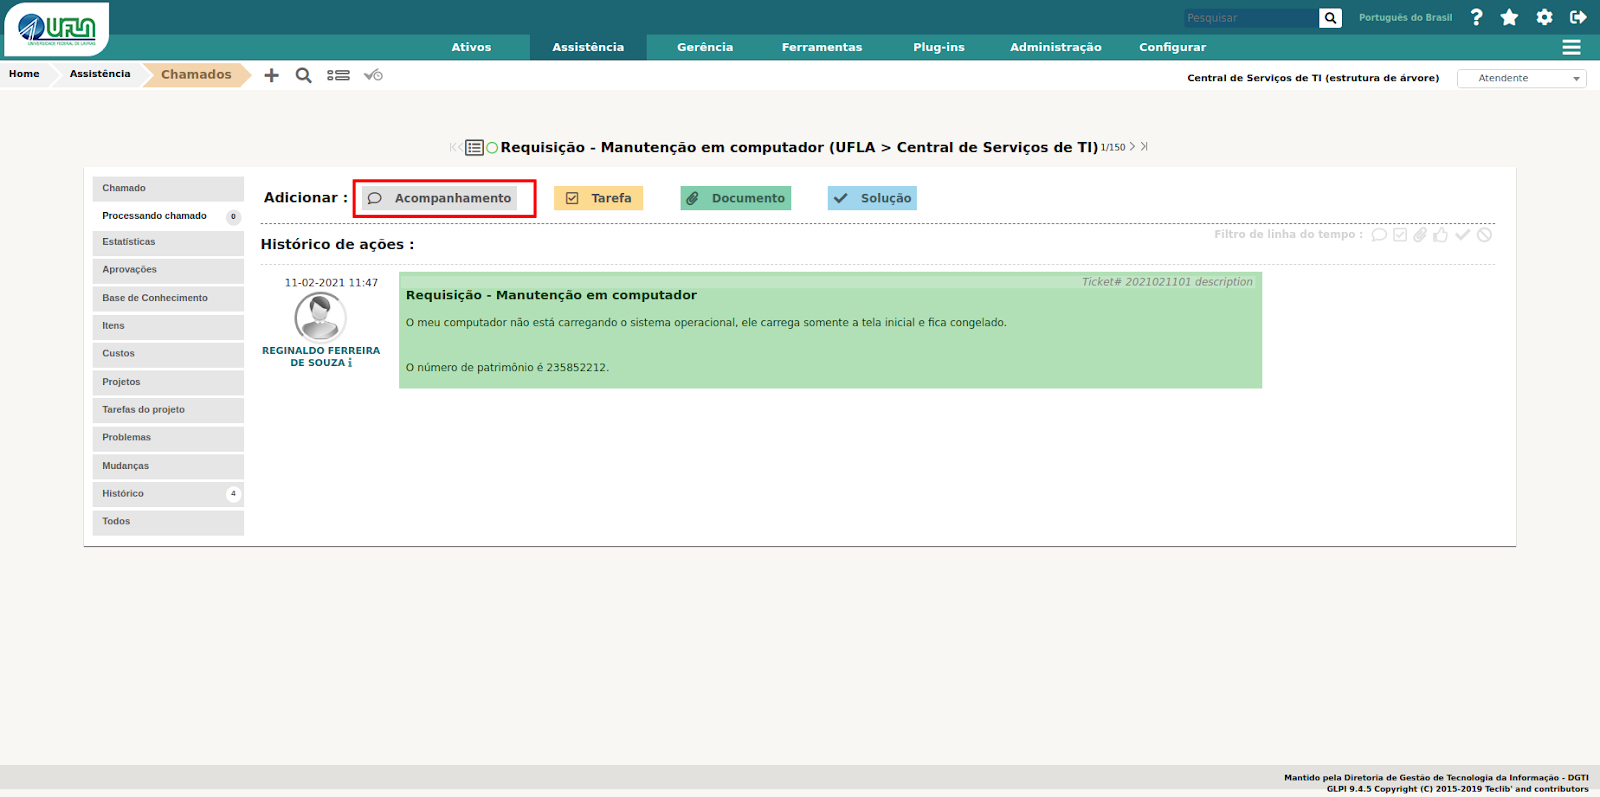
A seção “Processando Chamado” é onde os chamados são gerenciados e visualizados de fato. Nessa seção são cadastrados os objetos de análise e resposta dos chamados, observe na imagem a seguir.
A principal forma de manter os solicitantes informados sobre o andamento dos chamados é inserindo notas de “Acompanhamento”. Desta forma é recomendado que sempre seja feita a inserção de notas de acompanhamento para manter o solicitante informado sobre o andamento do chamado.
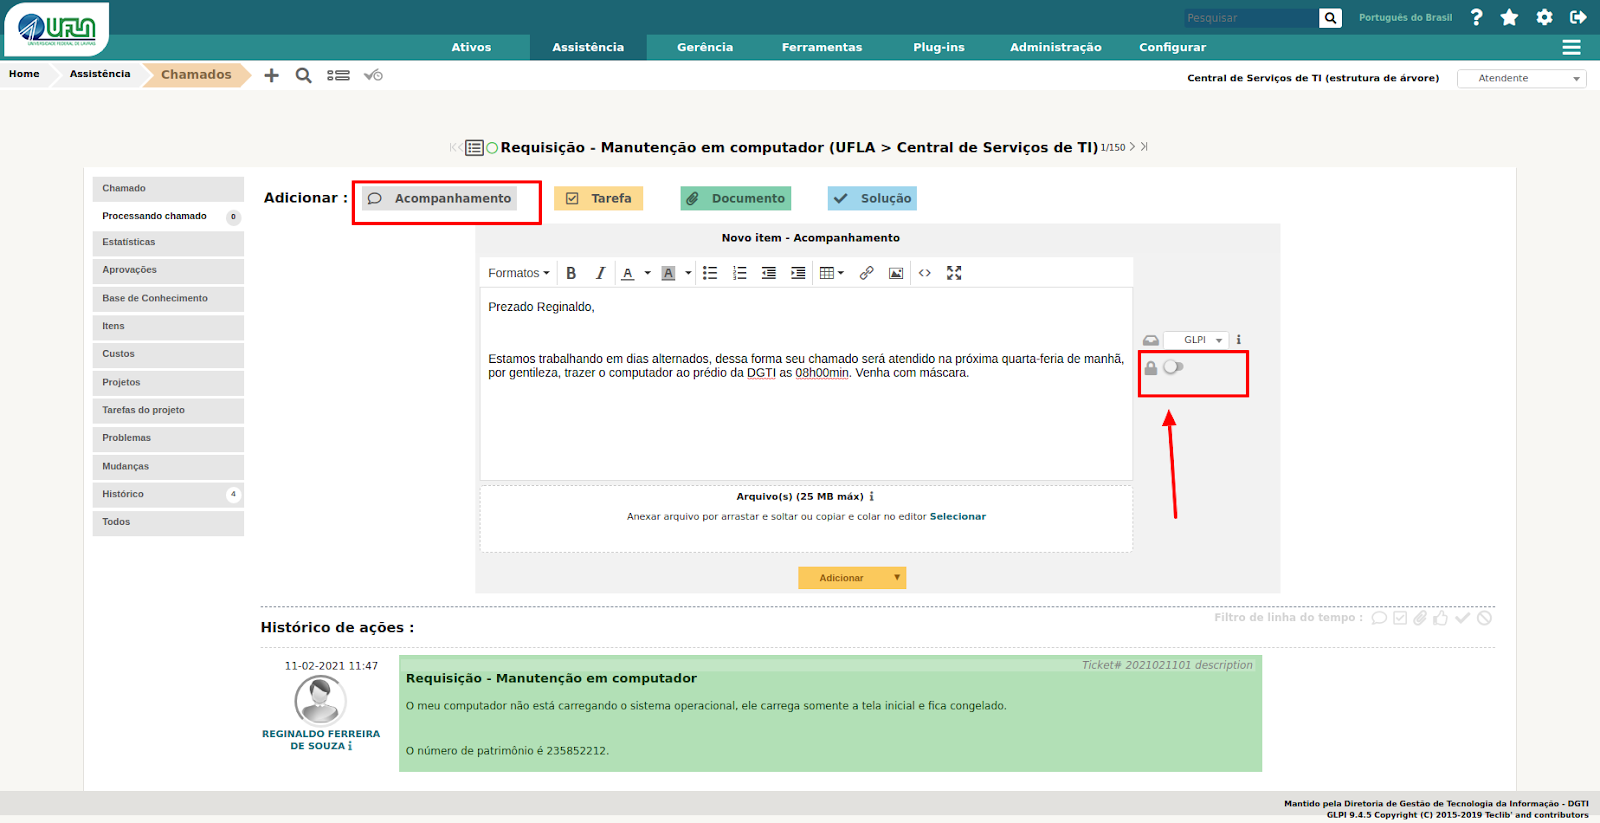
Para exibir nota de acompanhamento somente para os atendentes da DGTI é necessário acionar o ícone de cadeado no formulário de cadastro de notas de acompanhamento, conforme na imagem a seguir:
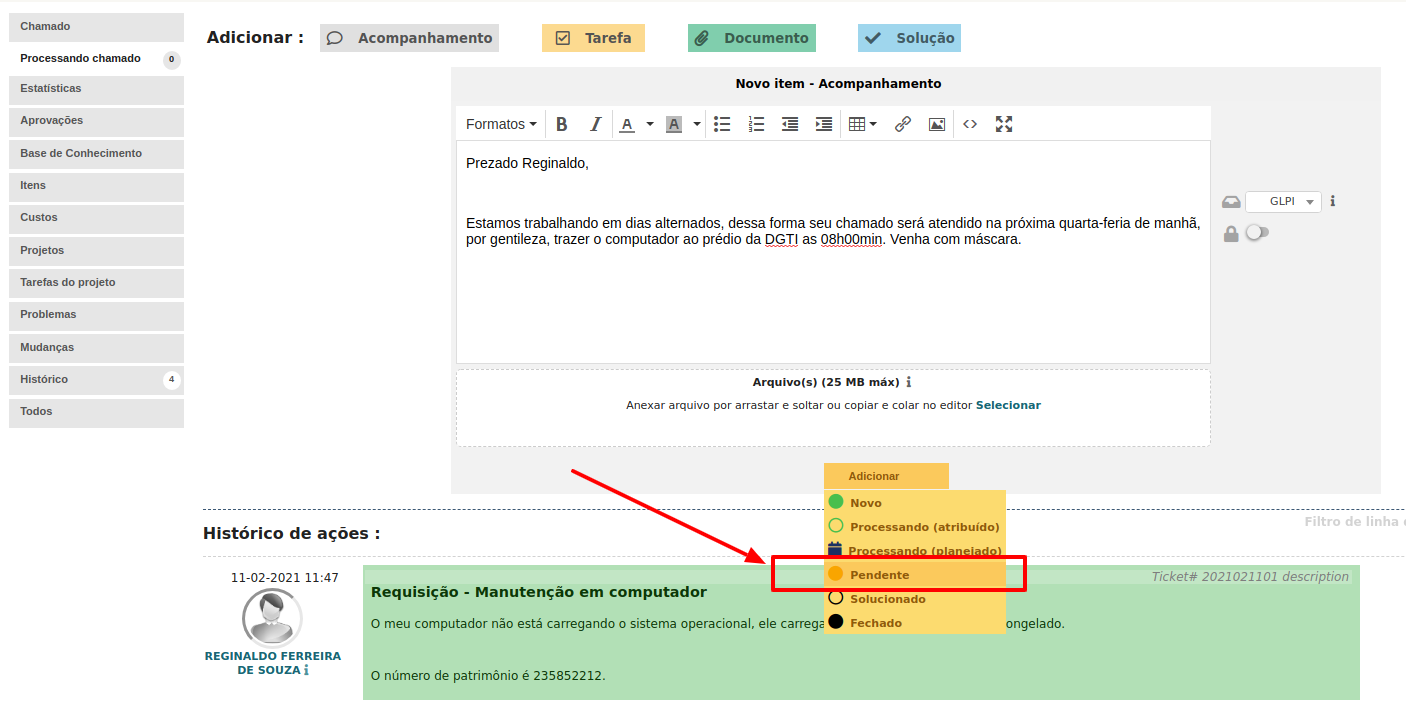
Se por algum motivo for necessário marcar o chamado como pendente, a partir de um acompanhamento, basta selecionar a opção “Pendente” no botão de “Adicionar” do formulário de cadastro de acompanhamentos. O chamado será atribuído ao técnico quando o solicitante cadastrar uma nota no chamado, se este estiver com o status pendente, observe na imagem a seguir:
#### 6 - Pedindo aprovação para atender chamado
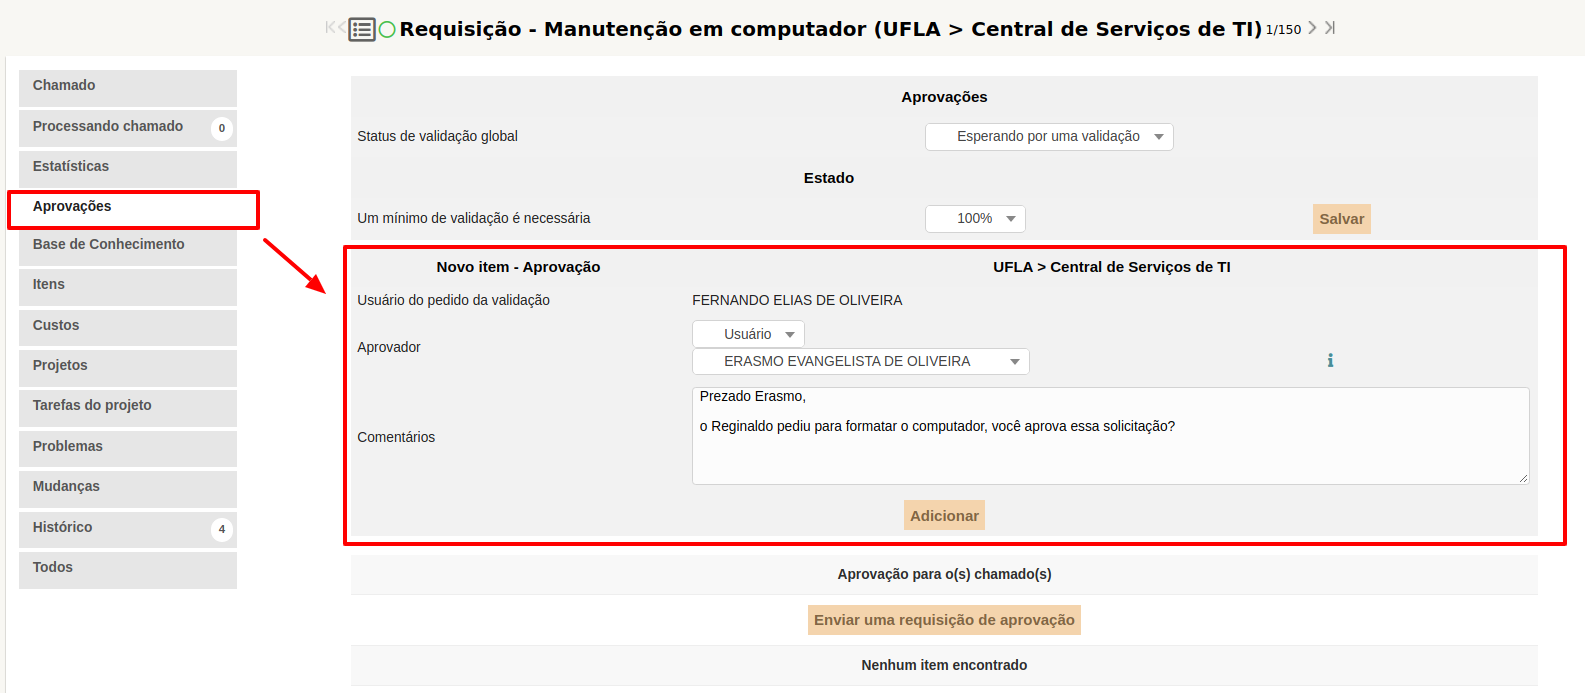
Há situações em que é necessário pedir a alguém a validação para atender um chamado, seja chefia, um interessado, ou uma pessoa específica para aprovação. Dessa forma é possível enviar pedidos de aprovação por meio do GLPI, na seção “Aprovações”, conforme ilustra a imagem a seguir. Pode ser informado mais de uma pessoa para aprovação e selecionar qualquer pessoa da UFLA.
#### 7 - Solucionando um chamado
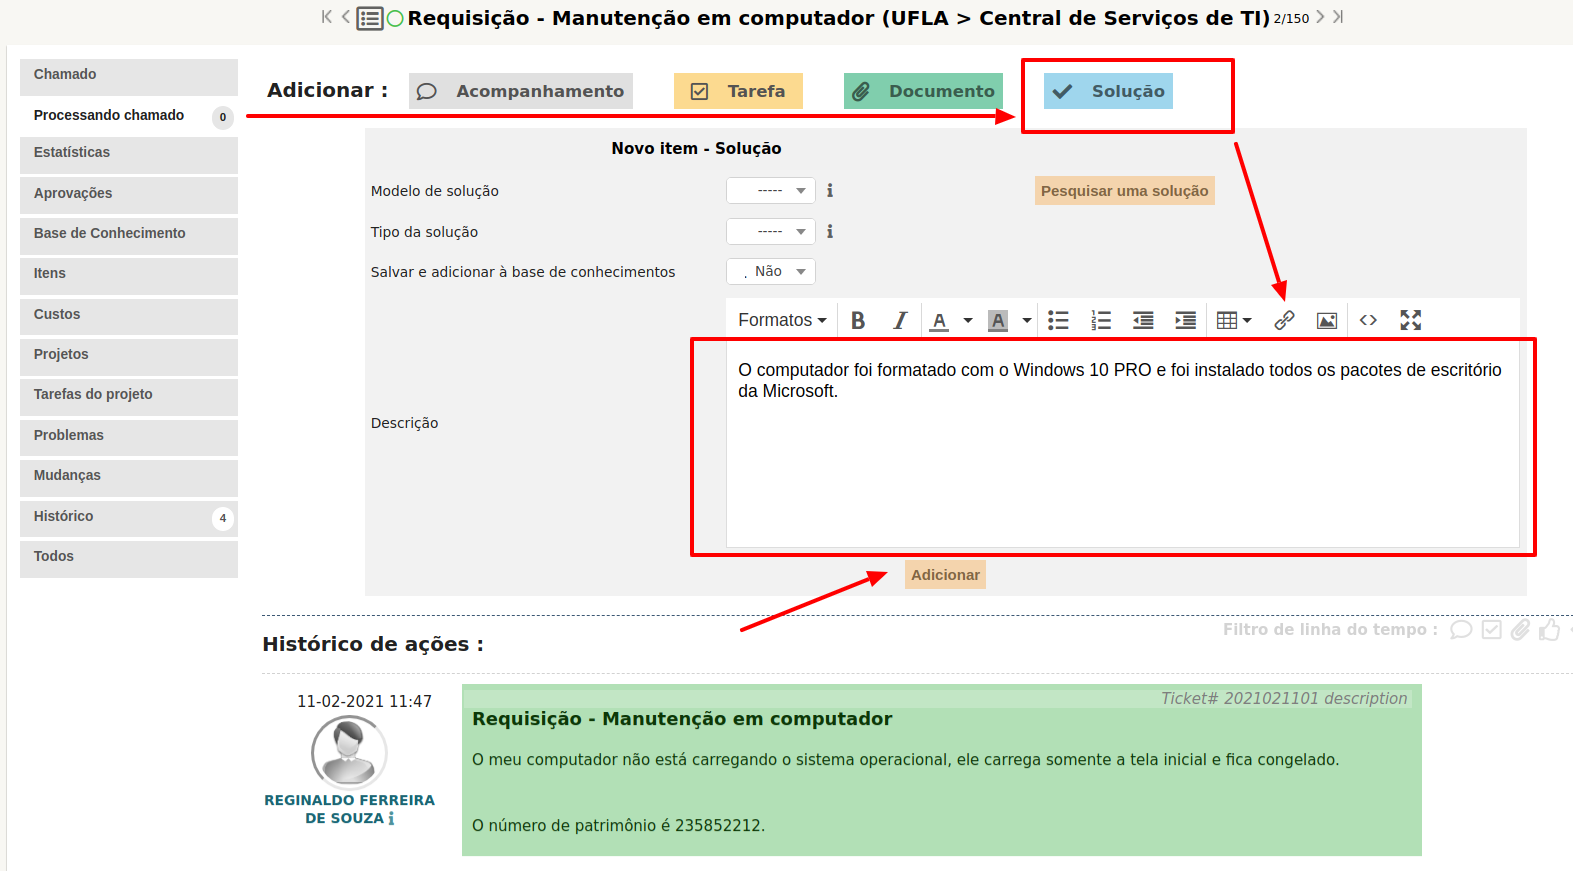
Para solucionar um chamado é necessário que o mesmo esteja associado a alguém, veja na imagem a seguir. Além disso é necessário acionar a opção "Solução" da seção “Processando Chamado” e inserir um texto, inteligente, sobre a solução.
Em geral, a solução de um chamado deve ser feita pela equipe da Coordenadoria de Operação e Segurança da Informação (COSI). Em vez de inserir uma nota de solução no chamado do GLPI, insira nota de acompanhamento e retorne o respectivo chamado para a última pessoa da COSI que o encaminhou. Caso seja necessário, insira uma nota de acompanhamento, pública, para o solicitante e uma nota de acompanhamento, privada, para a COSI. Desta forma, o solicitante terá conhecimento da solução por meio da nota de acompanhamento pública. A equipe COSI ficará responsável por inserir a nota de solução do chamado.
O chamado pode ser solucionado se julgar que não é necessário retorná-lo para COSI, pois o intuito deste procedimento é manter a equipe de operação, minimamente, informada das mudanças implementadas nos serviços de TI, sem prejudicar a notificação de solução ao solicitante. Mudanças são as alterações em, mas não se limitando a estas: regras de negócios, permissões de acesso, domínios, servidores, estrutura de página, inclusão de grupo de usuários, relatórios e procedimentos de operação.
#### 8 - Enviando tarefas para um colega, a partir de um chamado
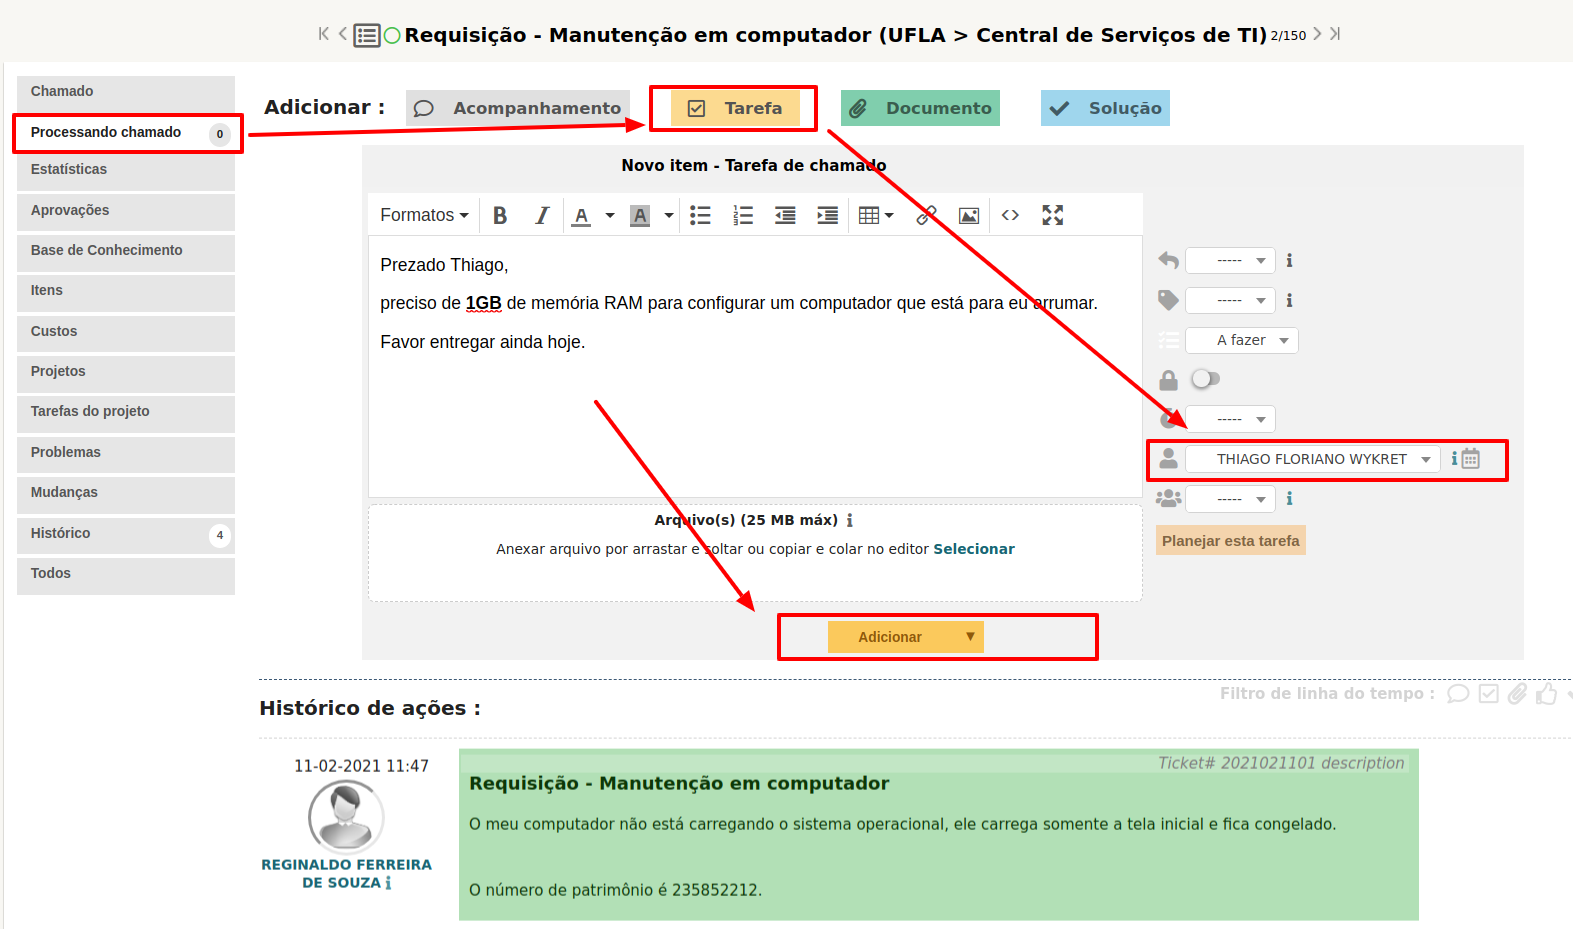
Quando lhe for atribuído um chamado cuja solução necessita de uma pequena intervenção de um colega, você pode criar uma tarefa para essa pessoa em vez de lhe atribuir o chamado. A tarefa funciona como um chamado, mas está num chamado específico. A imagem a seguir ilustra a opção para criação de tarefa em um chamado:
Como mencionado anteriormente, as tarefas são exibidas na seção “Tarefas de chamado para fazer” da página inicial do GLPI.
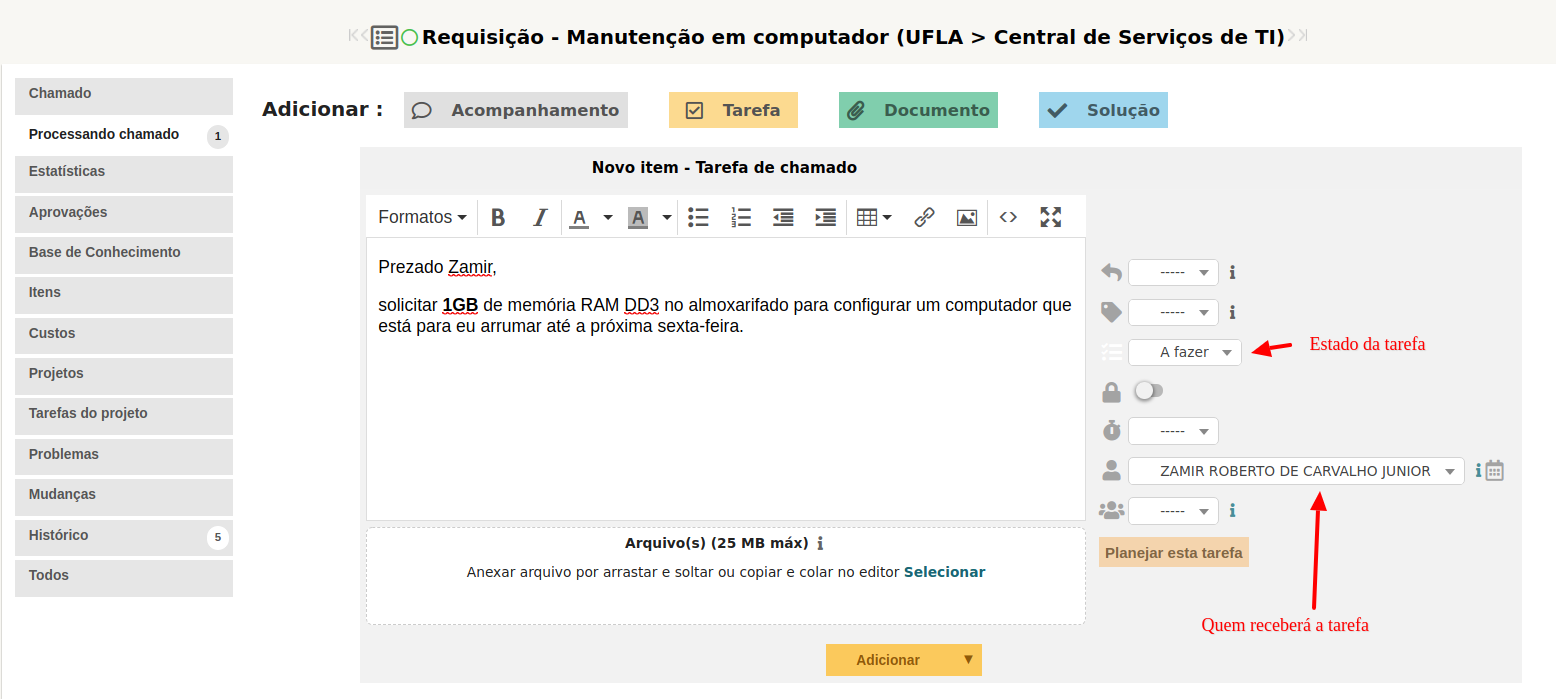
Consideremos que um técnico receba um chamado no GLPI solicitando a manutenção de um computador, em que será necessário trocar peças, entretanto a aquisição de peças é com outro técnico. Nesse contexto, o técnico cria uma tarefa no chamado e atribui ao outro técnico responsável por fazer a aquisição. Vale ressaltar que o solicitante visualiza as tarefas, se essas não forem marcadas como privadas. Recomenda-se que o estado da tarefa seja “A FAZER”.
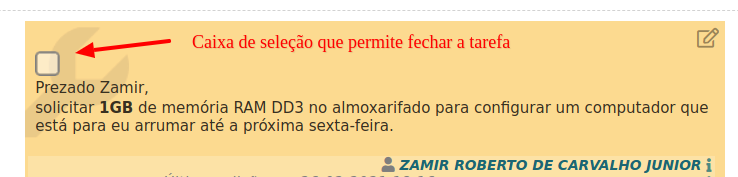
O técnico conclui a tarefa clicando na “caixa de seleção” referente à tarefa ou selecionando a opção “FEITO” no estado da tarefa, no modo de edição da respectiva tarefa.
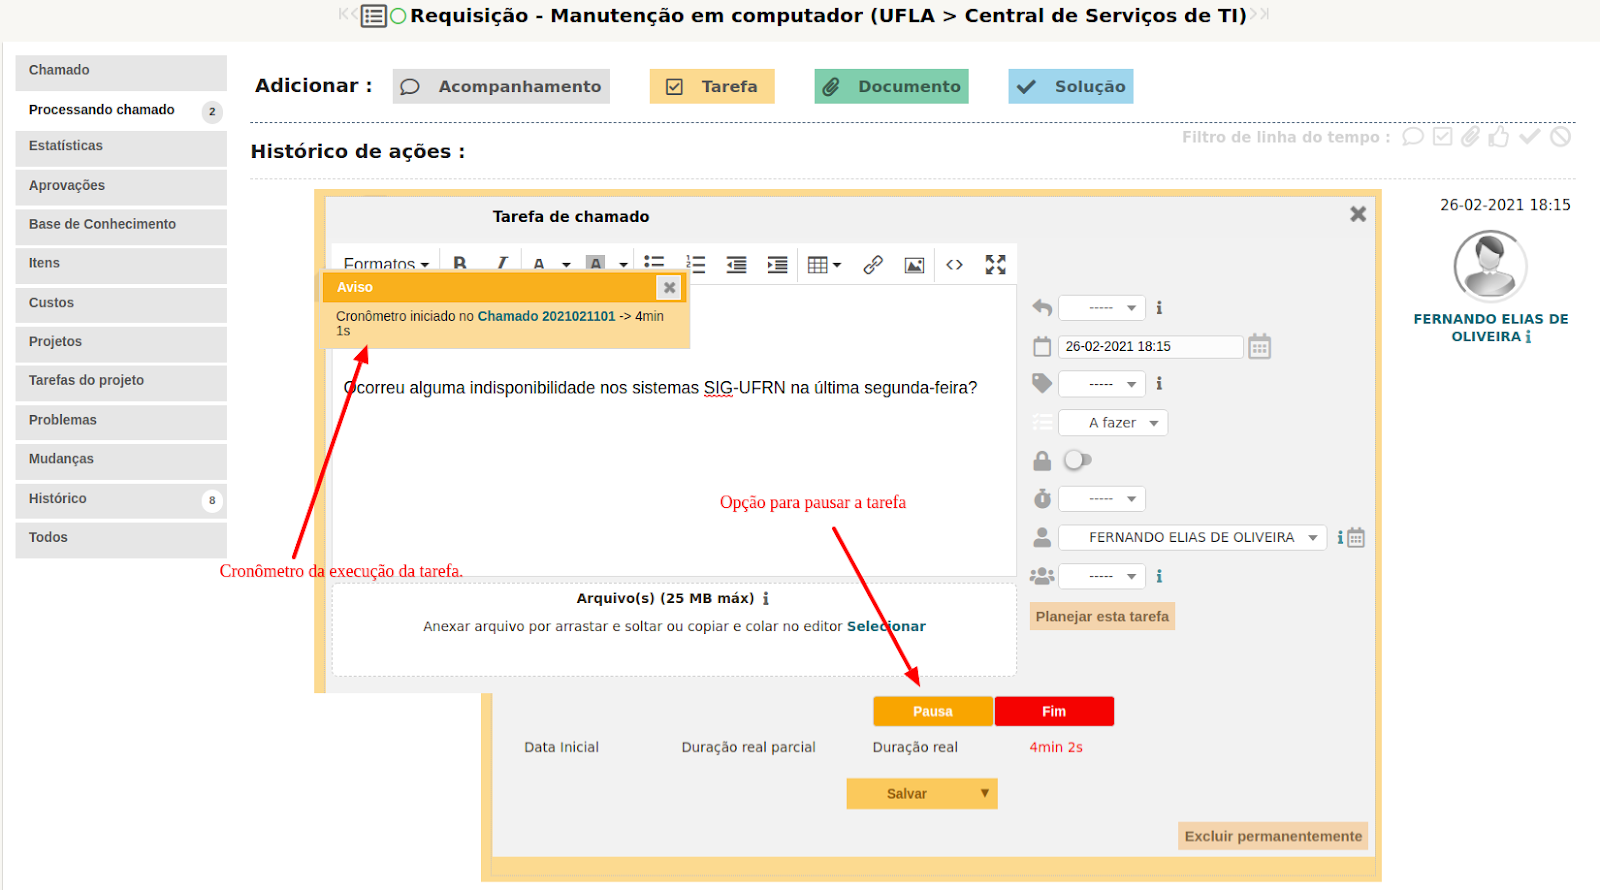
Quando o técnico acessa a tarefa no modo edição, que está atribuída para ele, é possível acionar um contador de tempo que vai registrar o tempo gasto para atender aquela tarefa. A contagem do tempo de empenho na tarefa inicia quando o botão "INÍCIO" é acionado. O sistema aciona um cronômetro após iniciar a tarefa.

Vale ressaltar que o GLPI permite acionar somente uma tarefa por vez. Com isso, para trabalhar em uma segunda tarefa é necessário “PAUSAR” a primeira e em seguida “INICIAR” a segunda tarefa. A tarefa é concluída ao clicar na opção “FEITO”.
Caso deseje fornecer uma resposta relativa a uma tarefa é possível fazer isso no conteúdo da própria tarefa, ou inserir uma nota de acompanhamento no chamado.
É possível criar um modelo com texto padrão para a categoria de uma tarefa, a necessidade de criação de templates deve ser comunicada à COSI. O uso de modelo se torna útil quando os conteúdos de um tipo de tarefa é passível de ser padronizado, conforme imagem a seguir:

As tarefas atribuídas a você são exibidas no painel inicial do GLPI, na mesma tela onde são exibidos os chamados atribuídos a você. Dessa forma é necessário consultar periodicamente se há tarefas atribuídas na seção “Tarefas de chamado para fazer”, conforme ilustra a imagem a seguir:

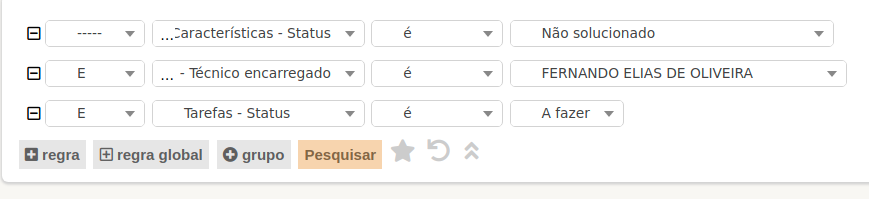
As tarefas também podem ser consultadas utilizando o formulário de busca de chamados no caminho “GLPI >> Assistência >> Chamados >> Processando Chamado”, por meio das opções de filtro:

#### 9 - Consultar chamados
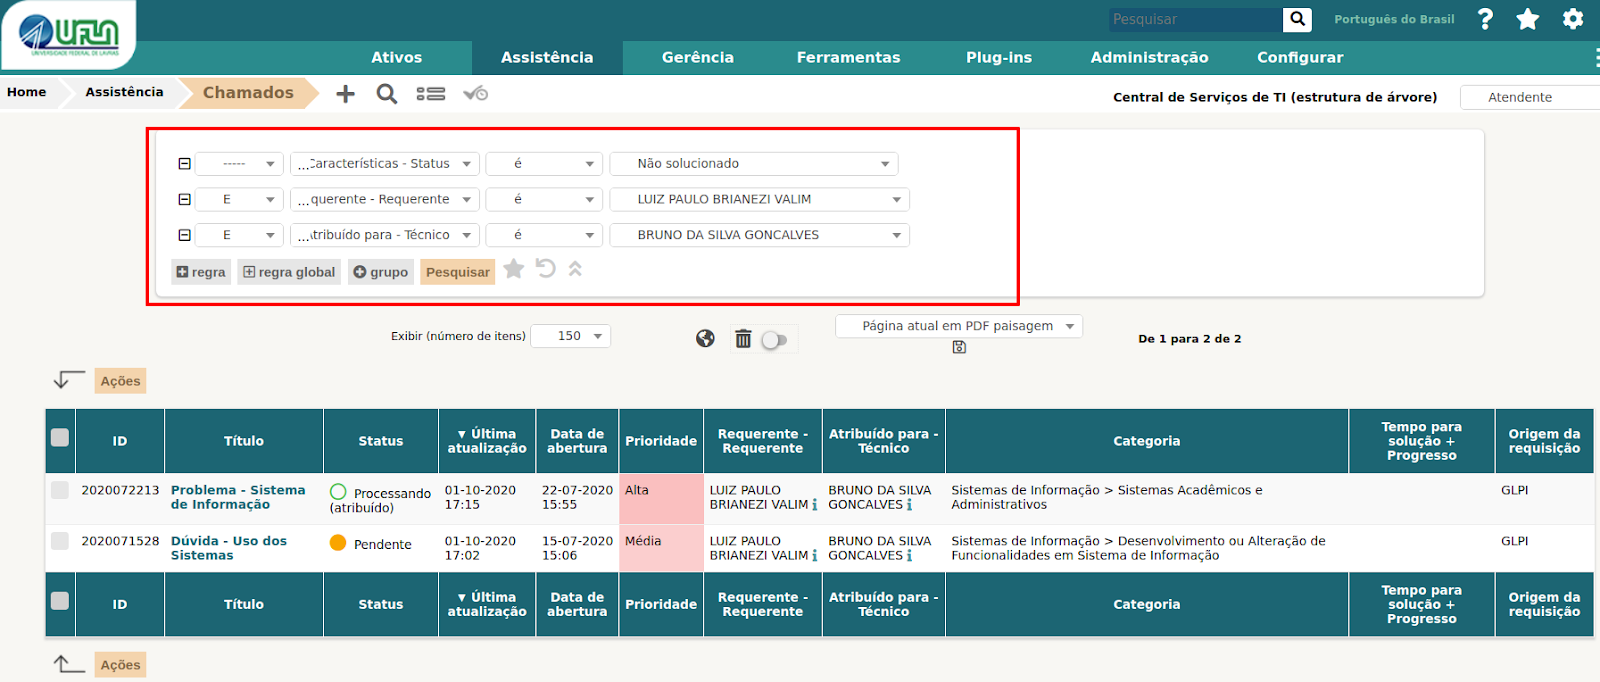
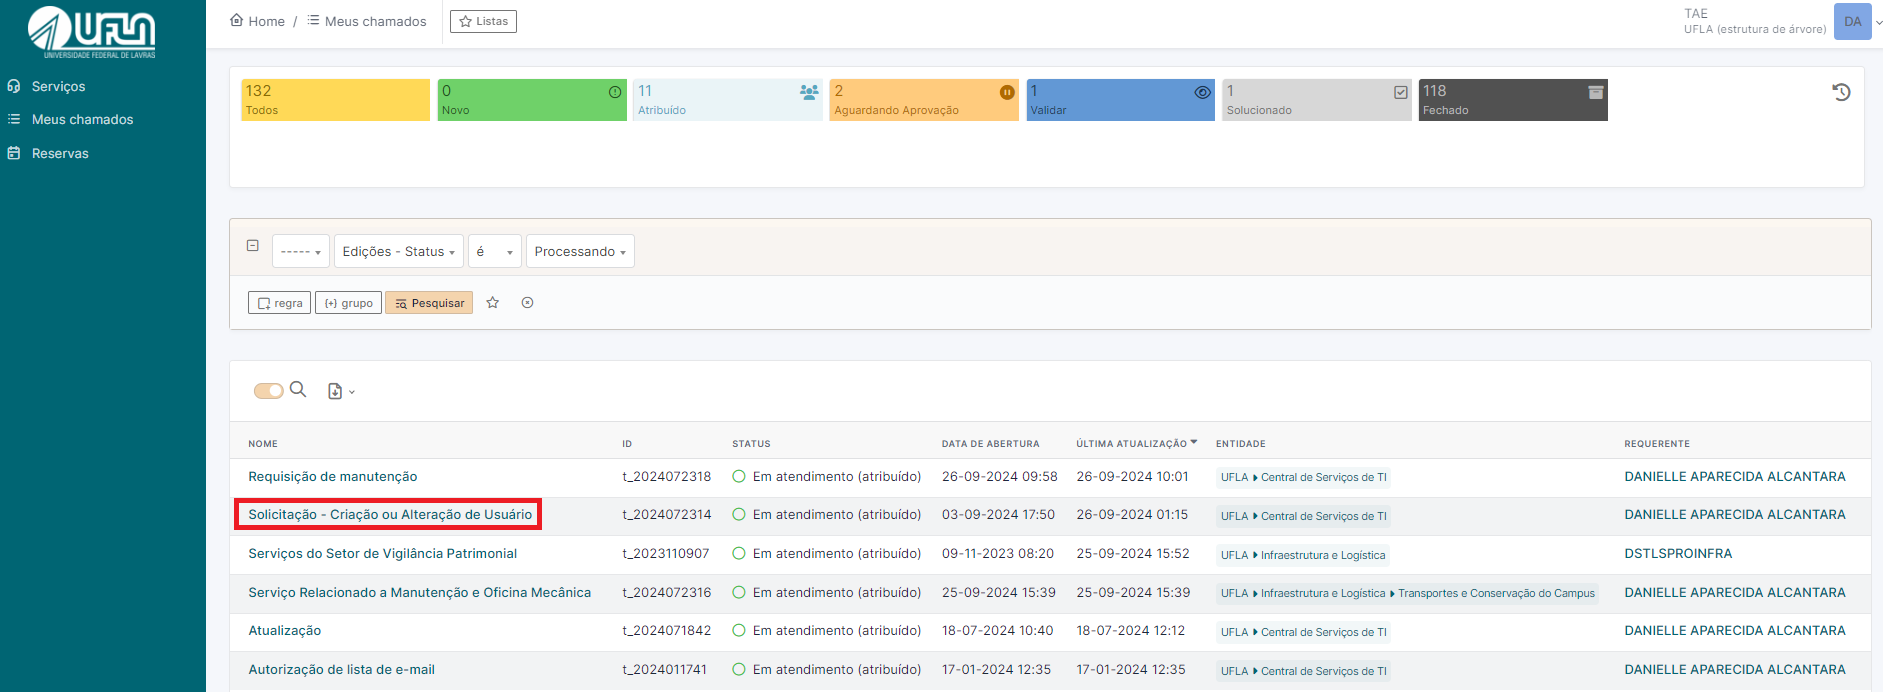
Para consultar chamados basta acessar o caminho “Assistência >> Chamados”, na tela exibida é possível fazer diversas combinações de filtros. Vale ressaltar para uso dos filtros que o solicitante é descrito como requerente e o atendente é descrito nos filtros como técnico.
#### 10 - Criar um chamado para terceiros
O GLPI permite criar chamadas para terceiros, inclusive para você, portanto é necessário acessar o caminho “Assistência >> Criar Chamado” , ou “Assistência >> Chamados >> e clicar na opção mais (+)” .
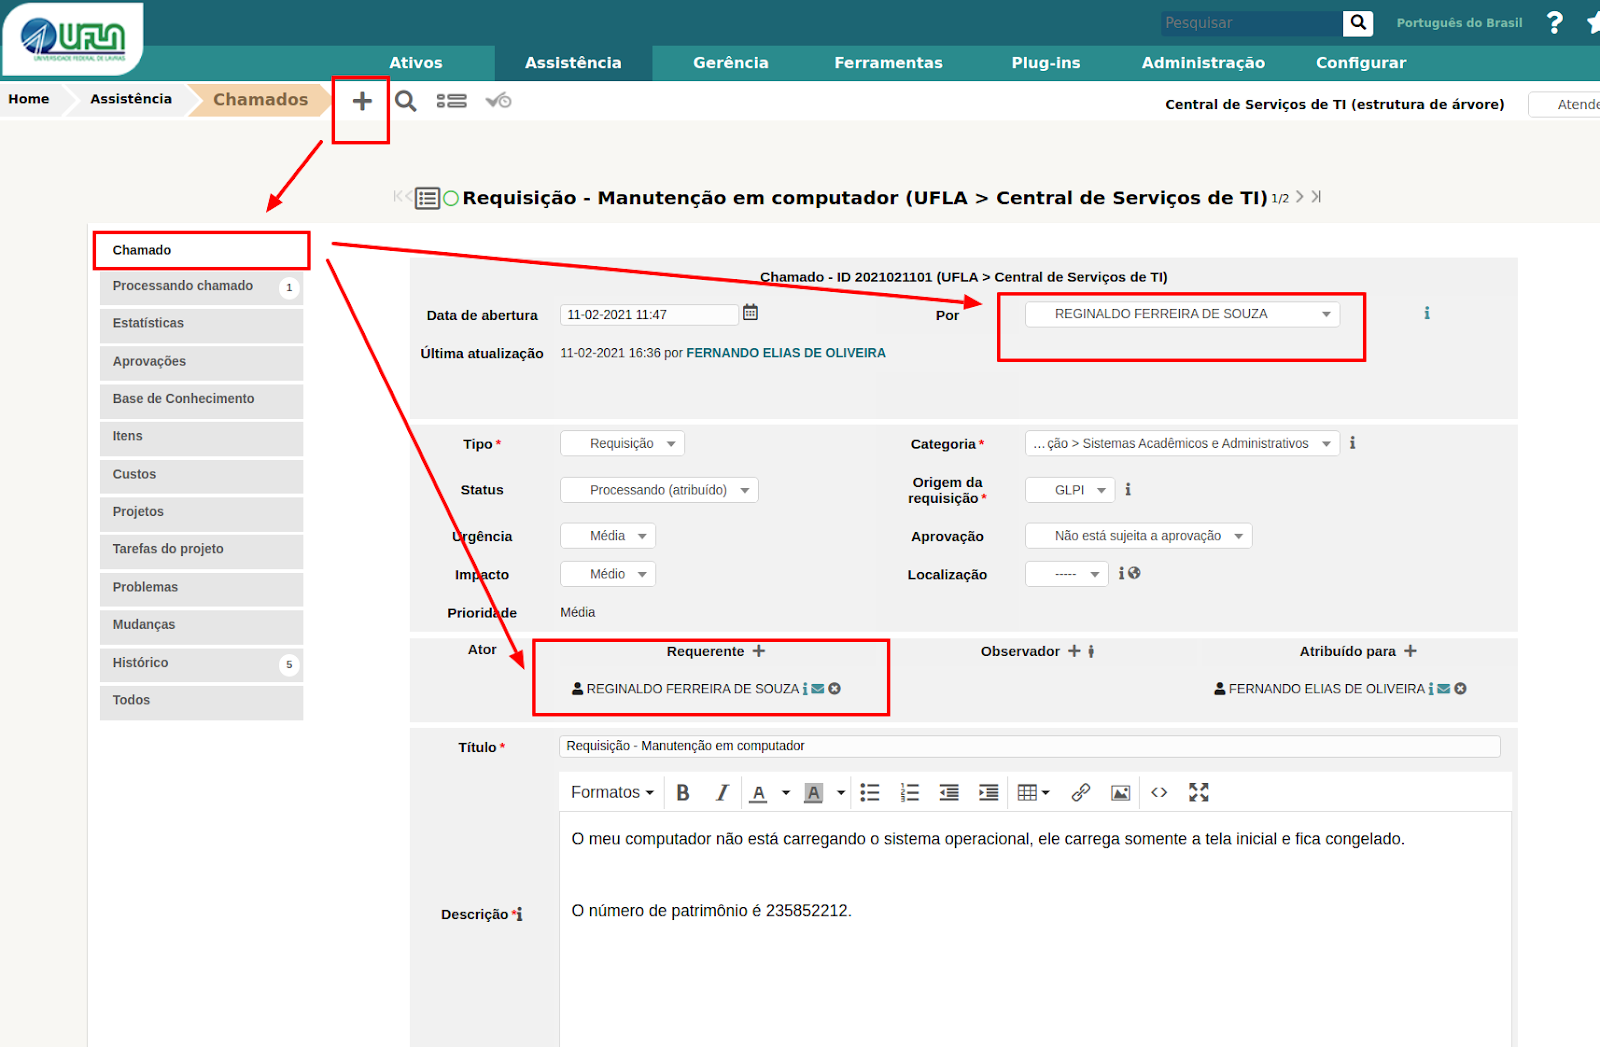
Na criação do chamado é necessário se atentar nos campos: “Por” (é quem vai avaliar o atendimento do chamado”, “Requerente” (em nome de quem ficará o chamado), “Tipo” (requisição ou incidente), “Categoria” (categoria de serviço do GLPI) e para quem será “Atribuído”.
#### 11 - Informações gerais
- O GLPI informa por e-mail sobre todas as ocorrências nos chamados, por e-mail.
- Esta é a ferramenta oficial para atendimento de serviços da DGTI e todo atendimento deve estar registrado nela.
- Quinzenalmente é feita a vistoria dos chamados atrasados para análise do motivo de atraso, os técnicos e coordenadores são notificados sobre os atrasos.
- Os serviços adicionados no GLPI devem estar no catálogo de serviços de TI da UFLA, aprovado pelo CIGOV.
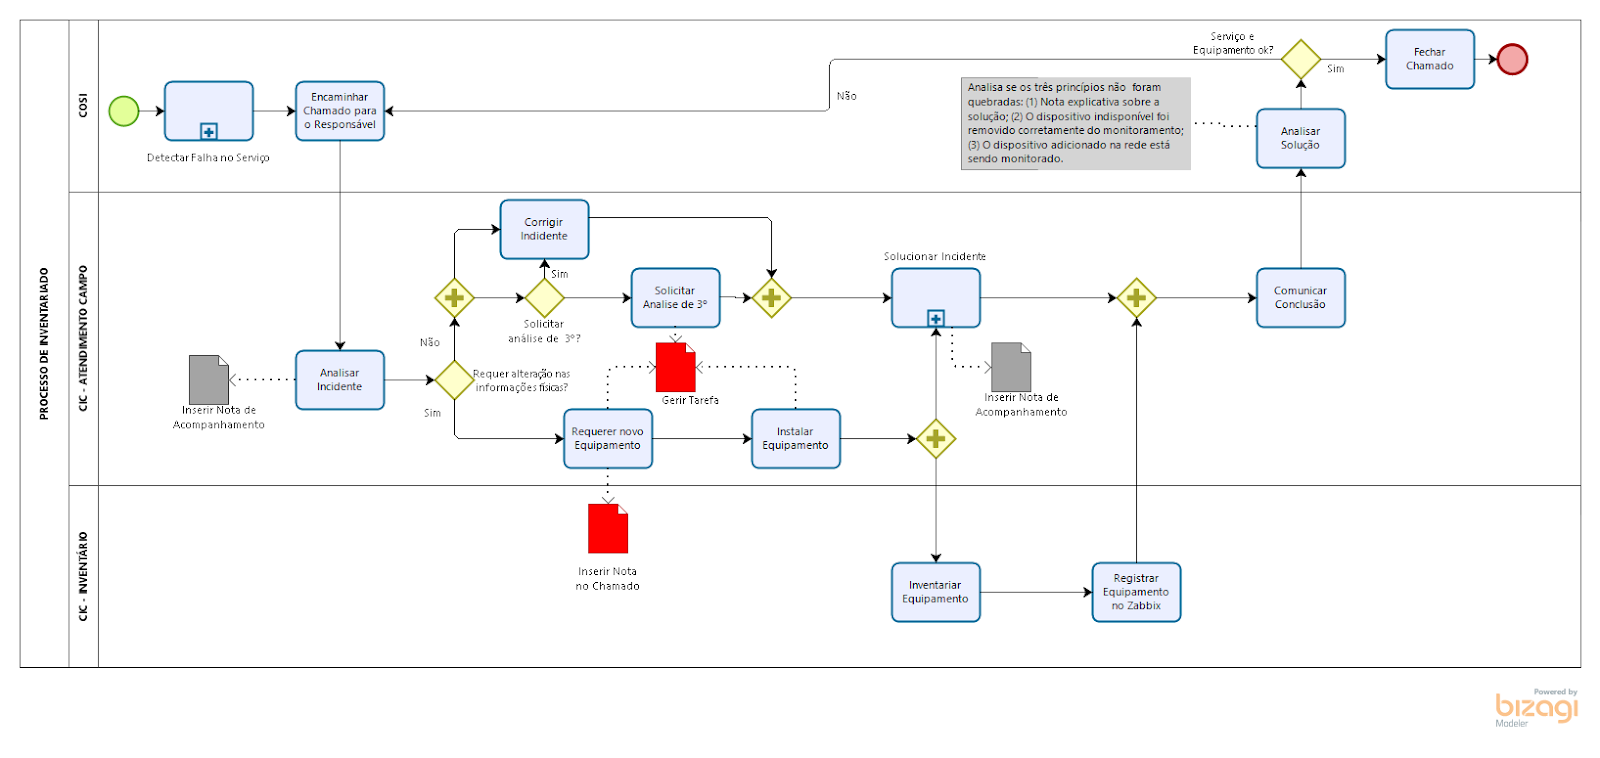
#### 12 - Modelo para controle das câmeras e switchs no GLPI & Zabbix
#### 12 - Documento antigo com as instruções
[https://docs.google.com/document/d/1\_s4HFHrldtjQknytRQqyUVjH-ybKUdz7A2sNocyDpJA/edit?usp=sharing](https://docs.google.com/document/d/1_s4HFHrldtjQknytRQqyUVjH-ybKUdz7A2sNocyDpJA/edit?usp=sharing)
# Como gerenciar chamados no GLPI - "Tutorial para atendentes de chamados"
####
1 - Diferença entre “requisição” e “incidente”
No GLPI há dois tipos de chamados (incidente e requisição):
- **Incidente** refere-se a um evento que não faz parte da operação padrão de um serviço, causando ou podendo causar uma interrupção ou redução na qualidade desse serviço.
- **Requisição** é uma solicitação para modificar alguma configuração relacionada a um serviço de TI, como, por exemplo, troca de senha, concessão de direitos de acesso lógico, criação de um site ou manutenção de um computador.
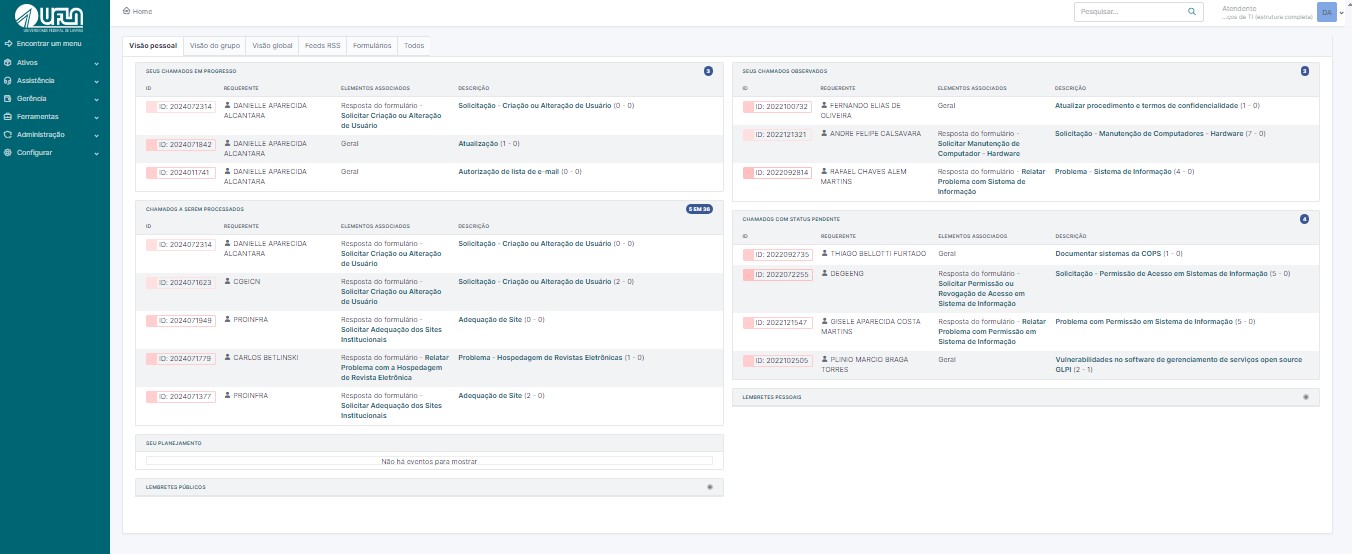
2 - Tela Inicial do GLPI
Na Figura 1, observa-se a tela inicial com o perfil de atendente, onde, na aba 'Visão Pessoal', é possível identificar os chamados atribuídos. No item destacado em vermelho, número 1 – Seus Chamados em Progresso, encontram-se os chamados nos quais você é o solicitante do serviço. No número 2 – Chamados a Serem Processados, estão os chamados que foram atribuídos a você para atendimento. No número 3 – Seu Planejamento, são listadas as tarefas agendadas para serem realizadas. No número 4 – Seus Chamados Observados, estão os chamados em que você foi designado para acompanhar o processo de atendimento. No número 5 – Chamados com Status Pendente, estão os chamados que aguardam retorno do solicitante ou a disponibilidade de recursos/materiais para execução..
[](https://kb.ufla.br/uploads/images/gallery/2024-09/Br8YXWttfyrUQ3cI-tela-inicial.jpg)
Figura 1: Tela inicial e identificação
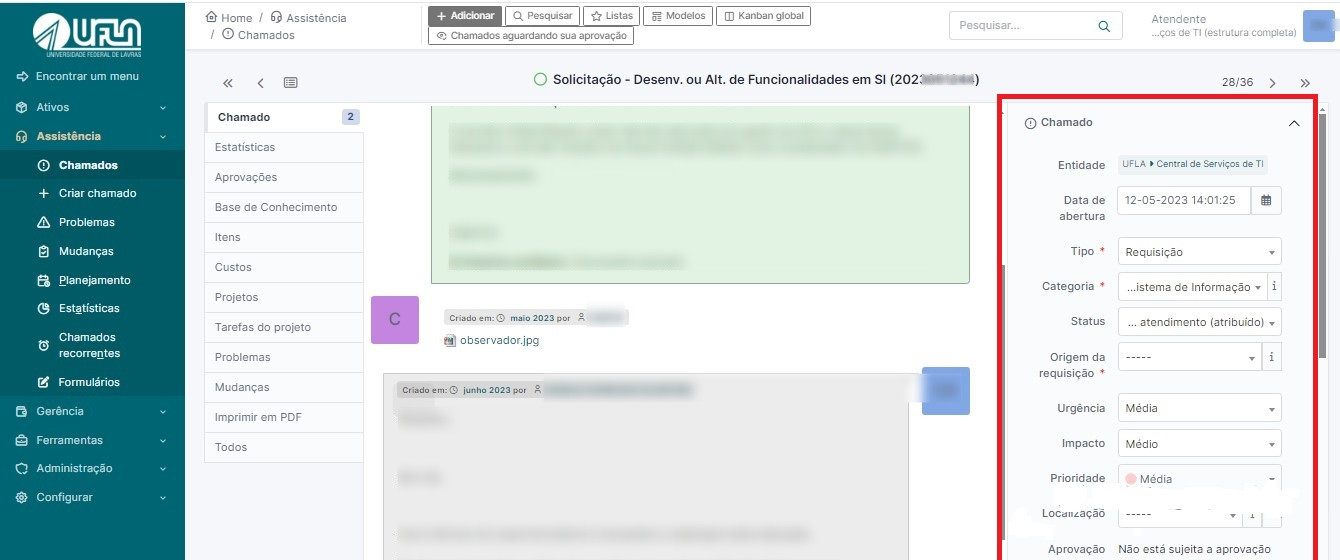
4 - Informações de um chamado
Na aba 'Chamado', os atendentes podem editar as informações de um chamado específico enquanto o mesmo não for solucionado, como mostrado em vermelho na figura 2 a seguir. Dois pontos importantes devem ser verificados durante o atendimento dos chamados: Tipo e Categoria. Em relação ao Tipo, é necessário confirmar se o tipo do chamado está correto (requisição ou incidente). Vale lembrar que, em chamados do tipo incidente, não é possível solicitar aprovação (validação) do solicitante, pois ele não tem acesso a essa opção. Já em relação à Categoria, é fundamental verificar se a categoria atribuída corresponde ao conteúdo do chamado. Essa verificação é importante para garantir uma catalogação precisa dos chamados, uma vez que eles serão utilizados para a geração de indicadores e métricas de atendimento.
[](https://kb.ufla.br/uploads/images/gallery/2024-09/3QDPjVp8VgI1HC5y-image-1-1.jpg)
É possível atribuir um chamado a um atendente da DGTI utilizando o campo 'Atribuído'. Basta digitar o nome desejado e selecioná-lo assim que aparecer na lista. Para incluir um observador, digite o nome no campo correspondente e selecione-o assim que aparecer na lista.
[](https://kb.ufla.br/uploads/images/gallery/2024-09/VgM228bIuNoorr6A-image-1-2.jpg)
IMPORTANTE: No GLPI, o solicitante é tratado como “Requerente” e o atendente é um “Técnico”.
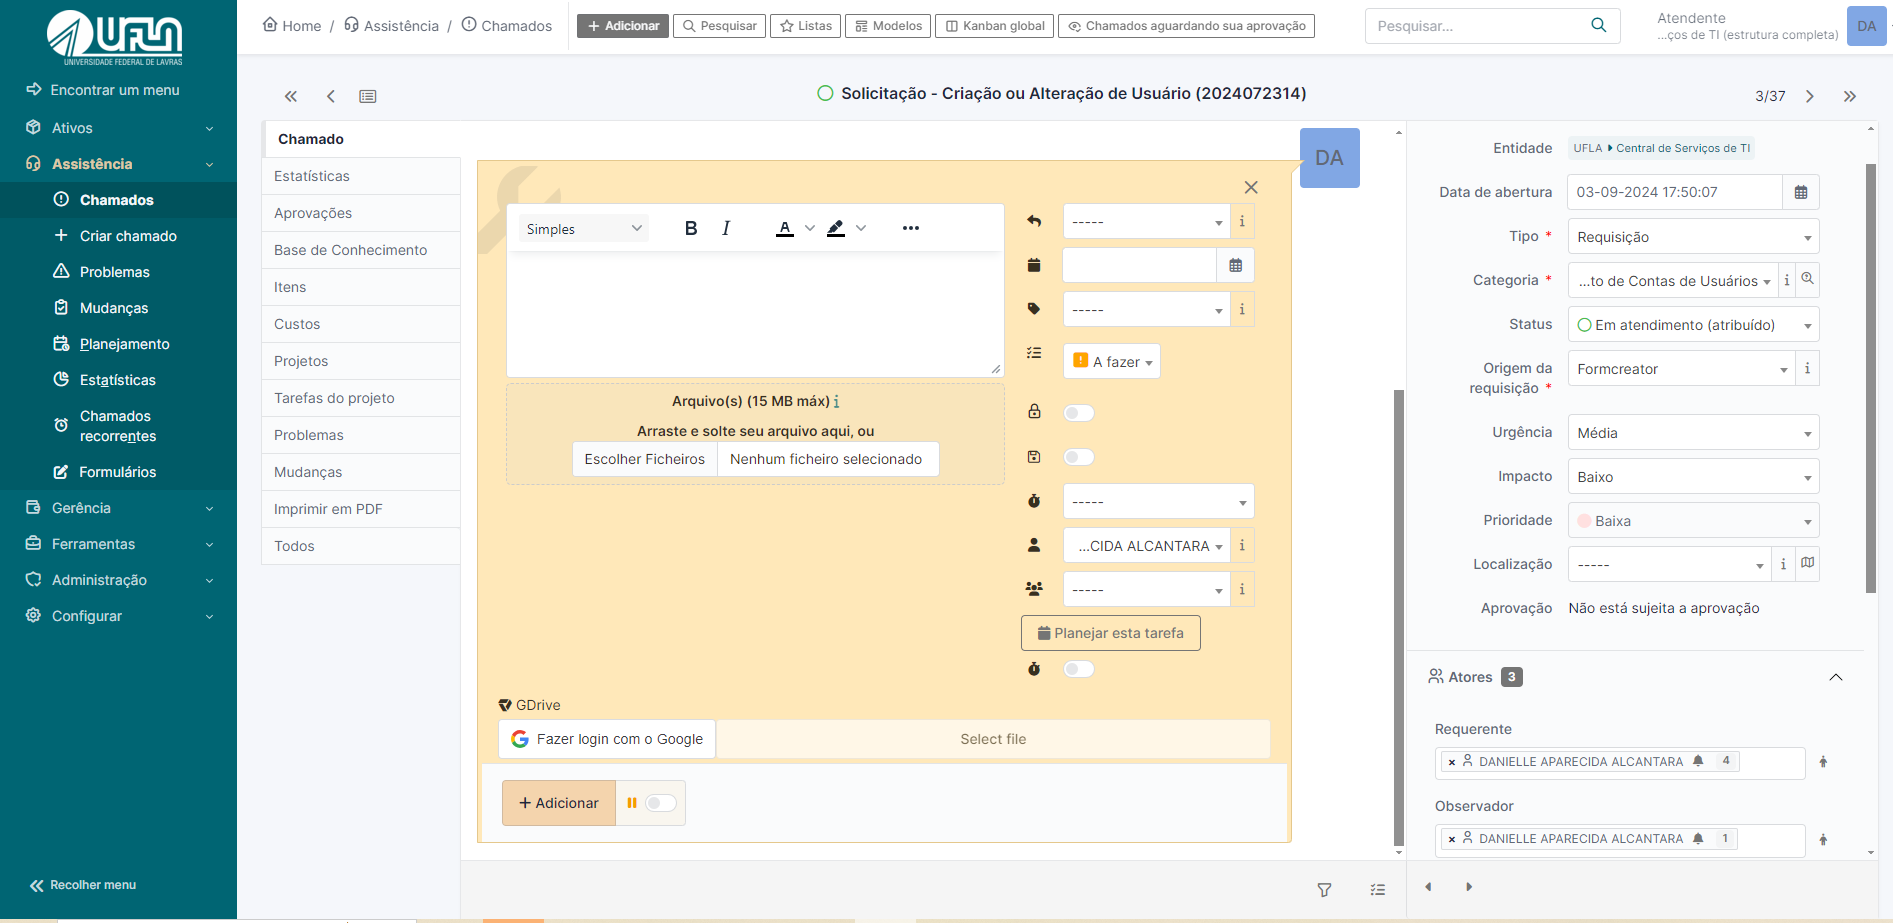
5 - Inserindo notas no chamado
Na aba “Chamado” é onde são registradas as ações de gerenciamento e movimentação realizadas. Nesta seção podem ser inseridos os acompanhamentos que podem ser 'criar uma tarefa', 'adicionar uma solução', 'adicionar um documento' ou 'solicitar validação'.
A inclusão desses acompanhamentos é altamente recomendada, pois promove maior transparência no processo e mantém o solicitante informado sobre o andamento da demanda."
[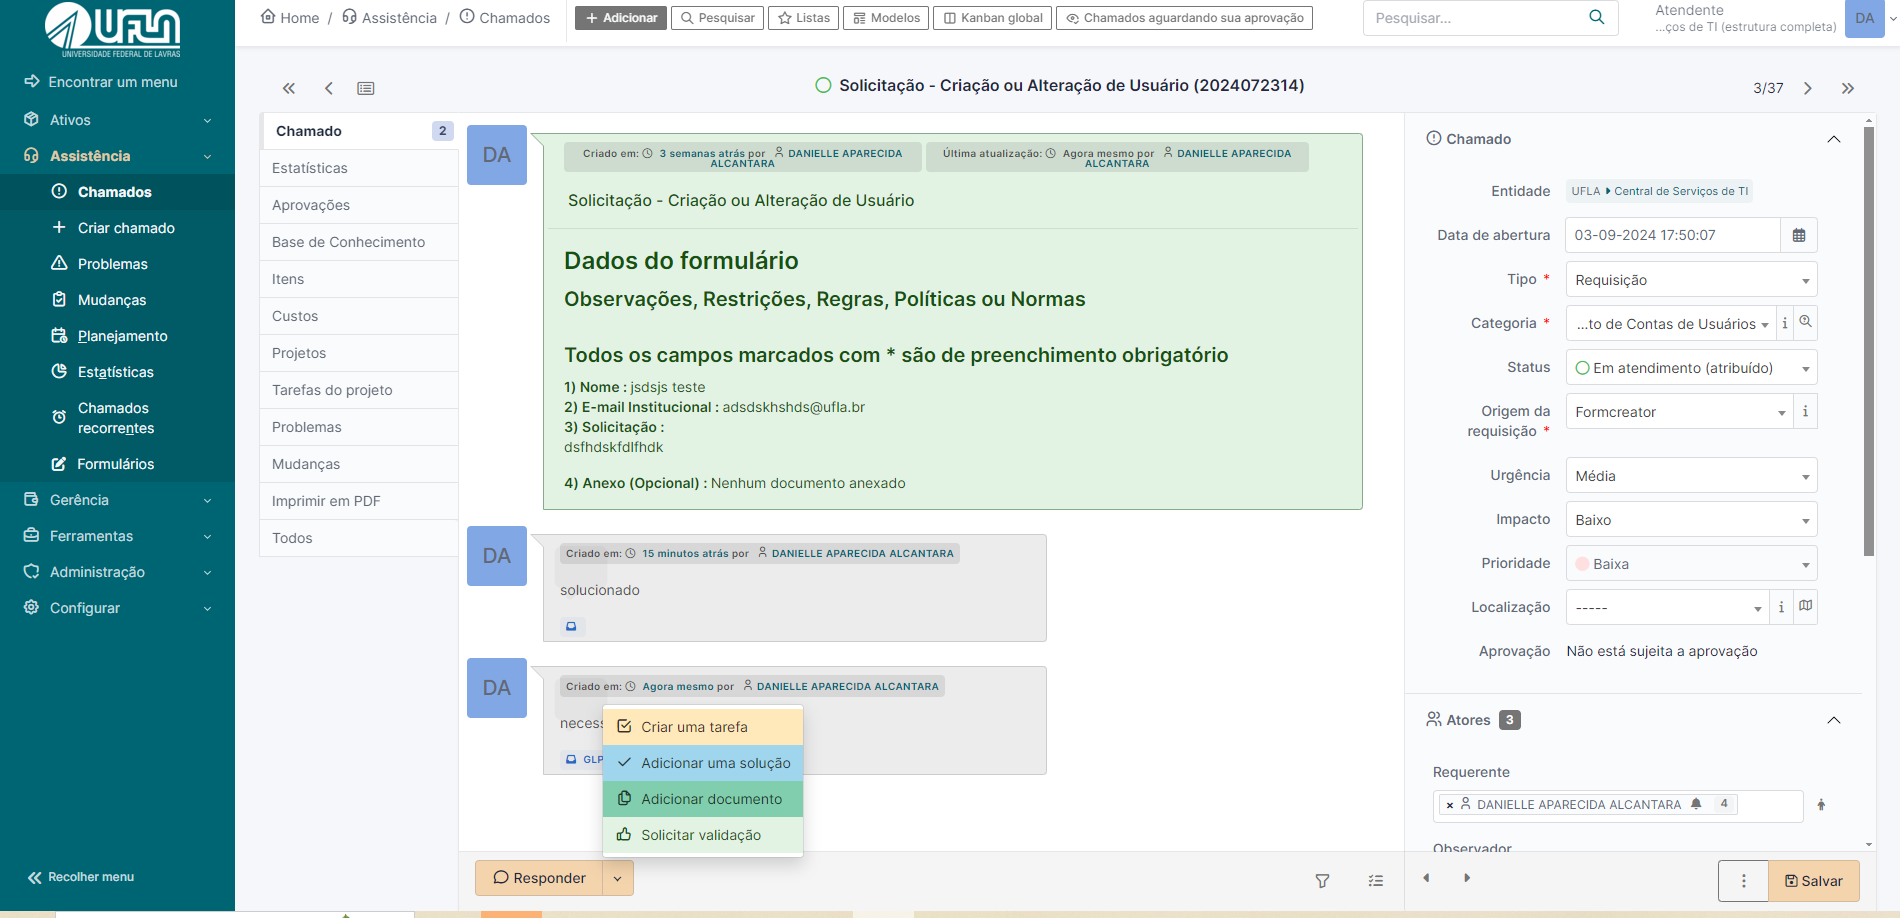](https://kb.ufla.br/uploads/images/gallery/2024-09/FpzUNzocdw6CHM0d-opcoes-da-acompanhamento.png)
Para exibir nota de acompanhamento somente para os atendentes é necessário marcar o ícone de cadeado no formulário de cadastro de notas de acompanhamento, conforme na imagem a seguir:
[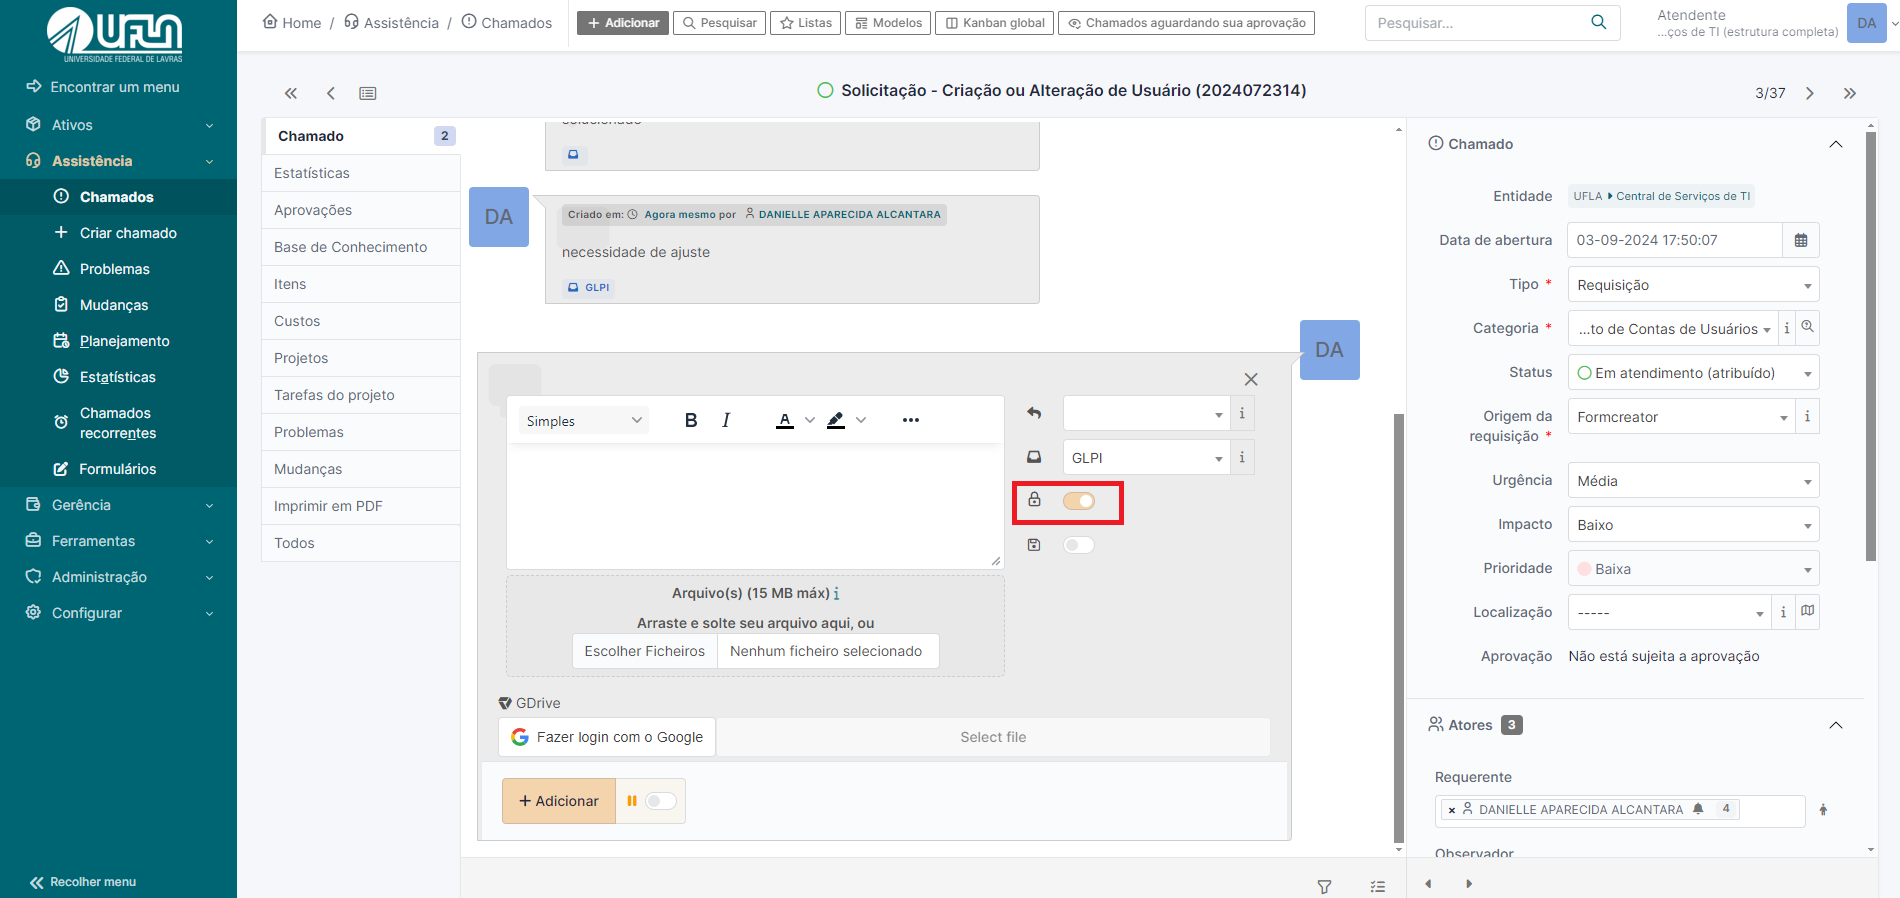](https://kb.ufla.br/uploads/images/gallery/2024-09/KRzXllBtIleRyZwC-mensagem-privada.png)
Se for necessário marcar o chamado como 'Pendente' a partir de um acompanhamento, basta selecionar a opção 'Pendente' ao salvar o formulário. O chamado retornará automaticamente para o status de atribuído ao técnico assim que o solicitante registrar uma nova nota \*ou iteração”, desde que o status esteja como 'Pendente'. Recomenda-se atribuir esse status quando houver falta de material ou quando for necessário aguardar um retorno ou informação adicional do solicitante. Veja a imagem a seguir para mais detalhes.
[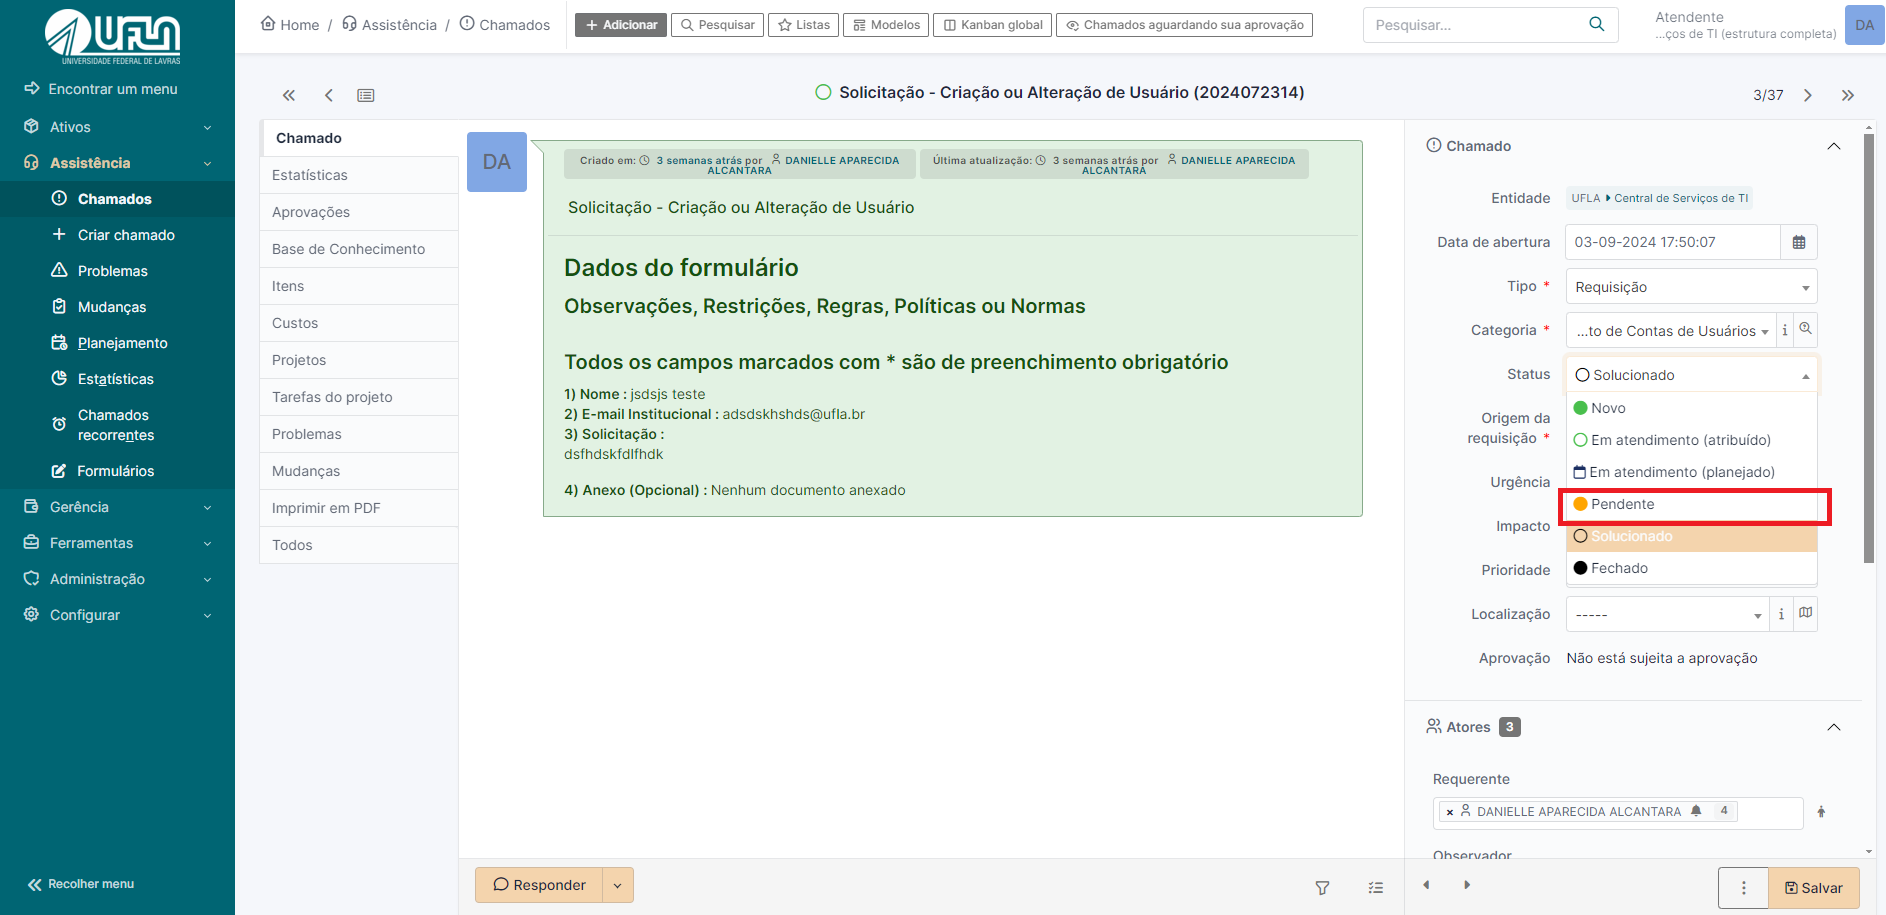](https://kb.ufla.br/uploads/images/gallery/2024-09/Lcn31RMZEFu0ejhj-status-pendente.png)
6 - Pedindo aprovação para atender chamado
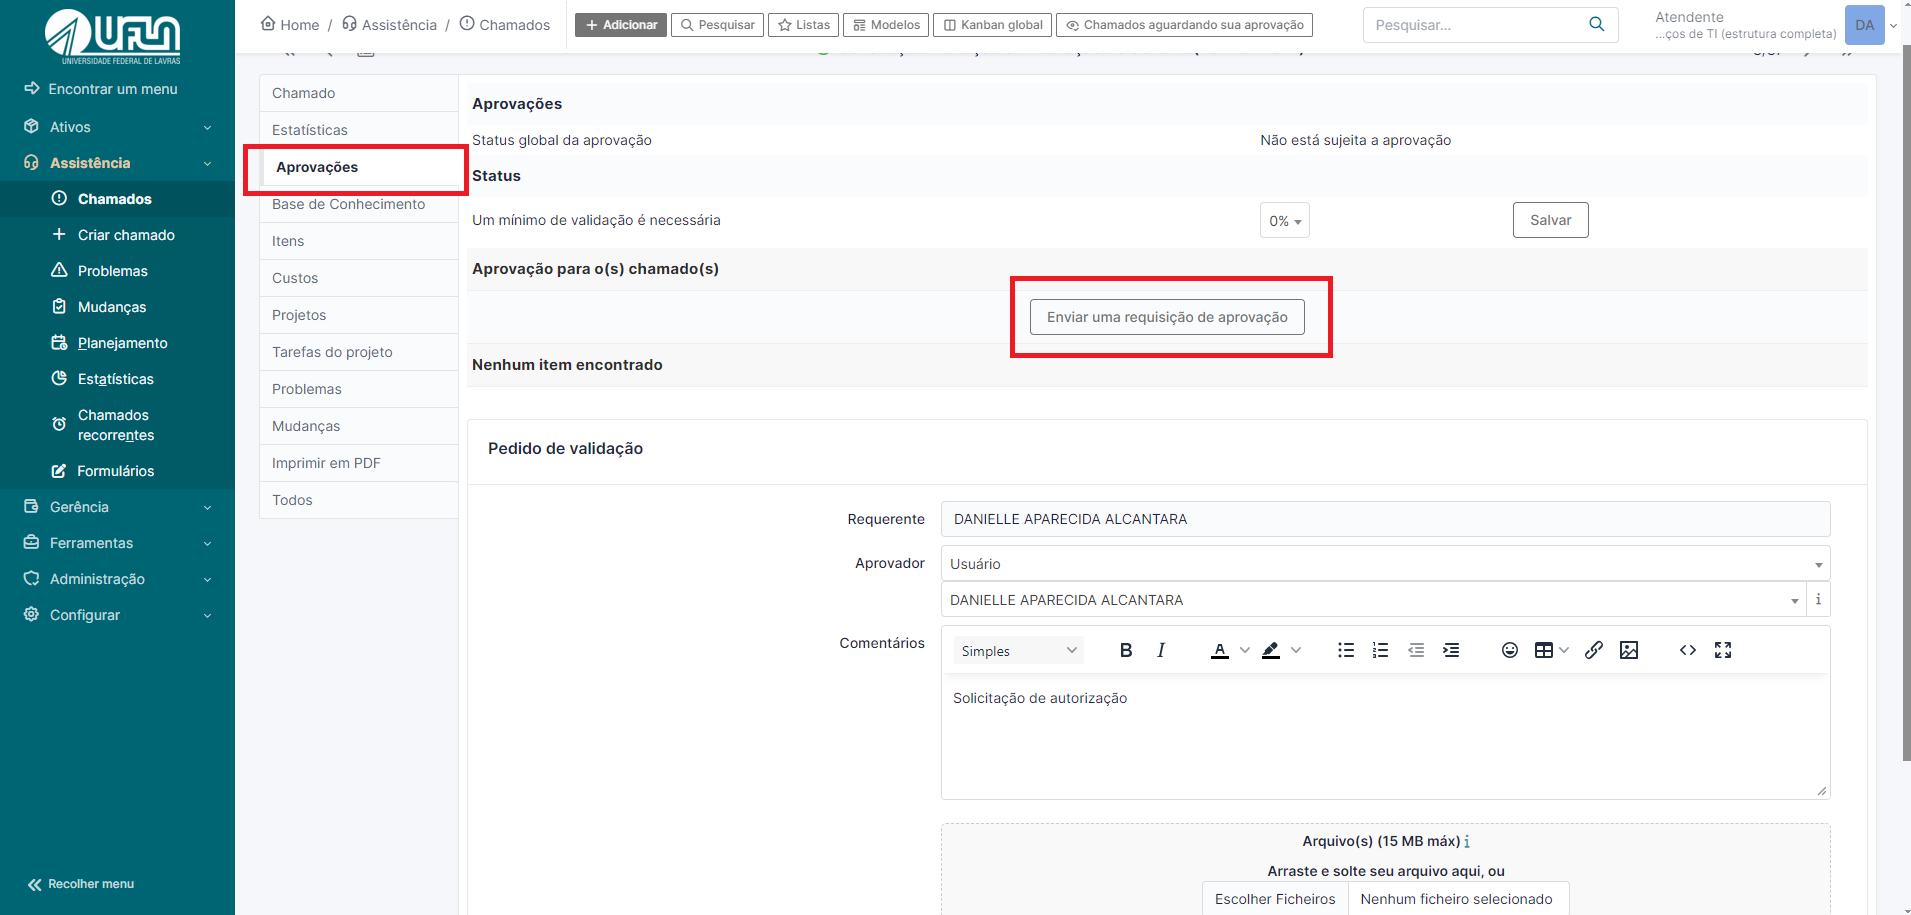
Há situações em que é necessário pedir a alguém a validação para atender um chamado, seja chefia, um interessado, ou uma pessoa específica para aprovação. Dessa forma é possível enviar pedidos de aprovação por meio do GLPI, na seção “Aprovações”, conforme ilustra a imagem a seguir. Pode ser informado mais de uma pessoa para aprovação e selecionar qualquer pessoa da UFLA.
Primeira opção
1. Clicar na aba aprovação
2. Clicar em enviar uma requisição de aprovação
3. Em aprovador, selecionar o tipo
4. Selecionar usuário do qual necessita-se da autorização;
5. Clicar em adicionar
[](https://kb.ufla.br/uploads/images/gallery/2024-09/L43EypaI3ESjt8S0-aprovacao-1-forma.png)
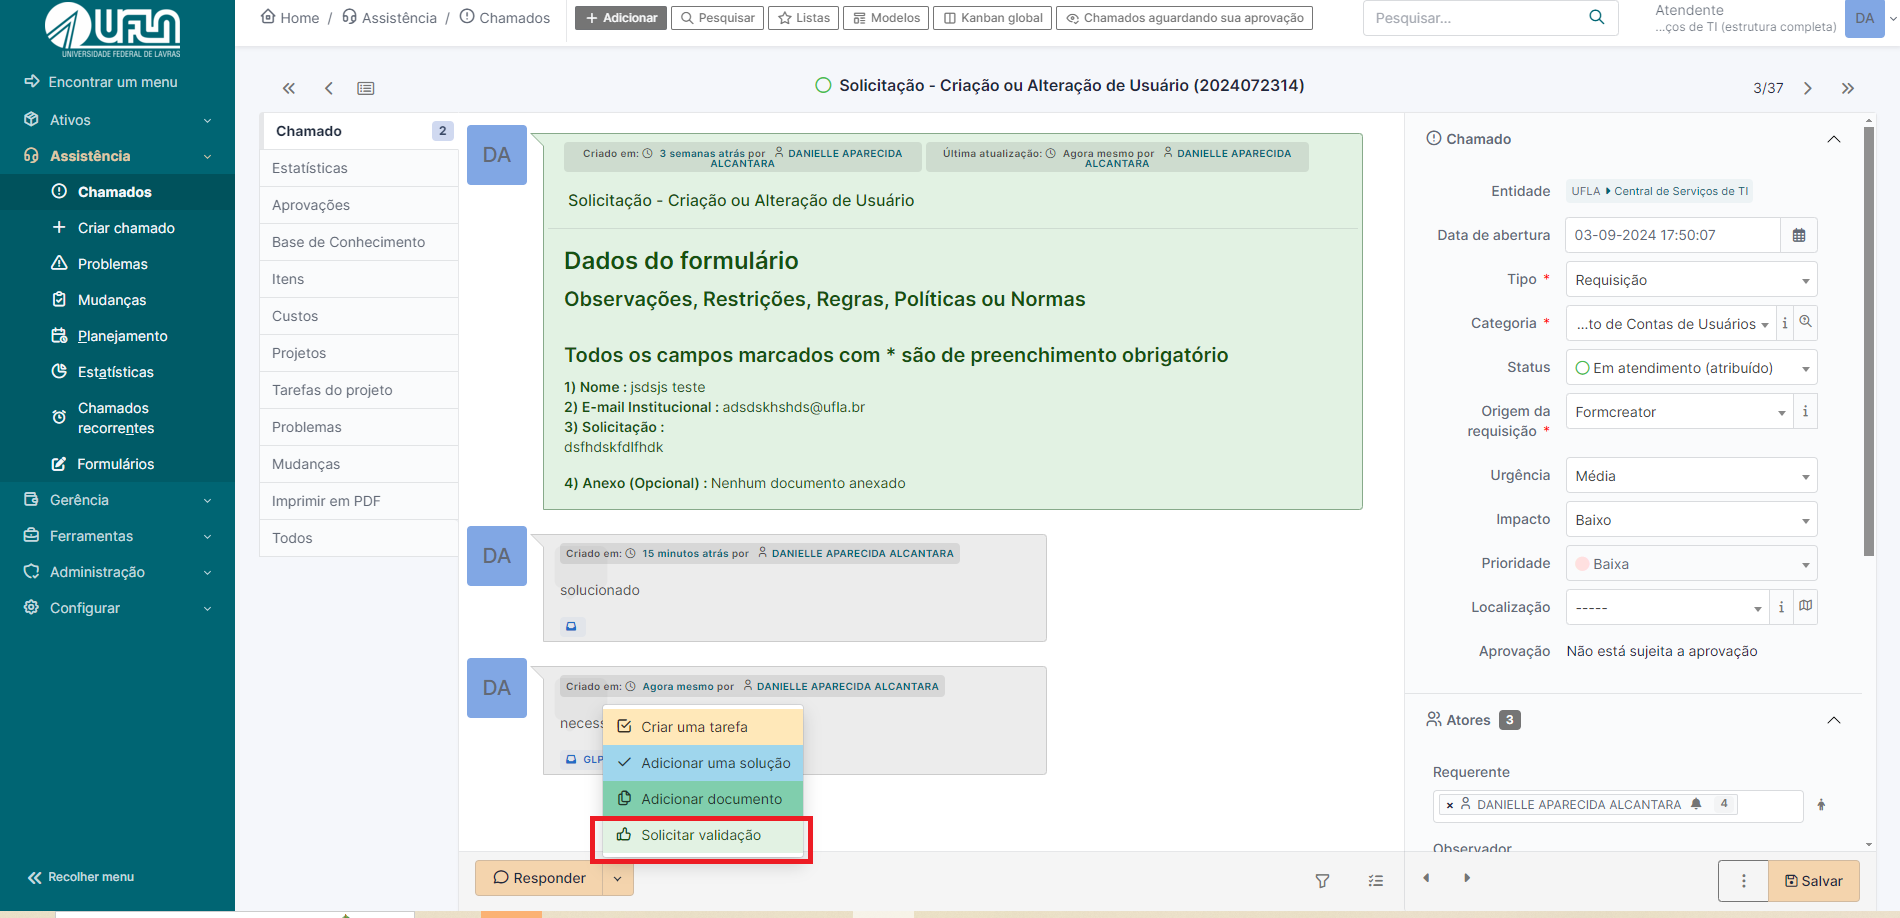
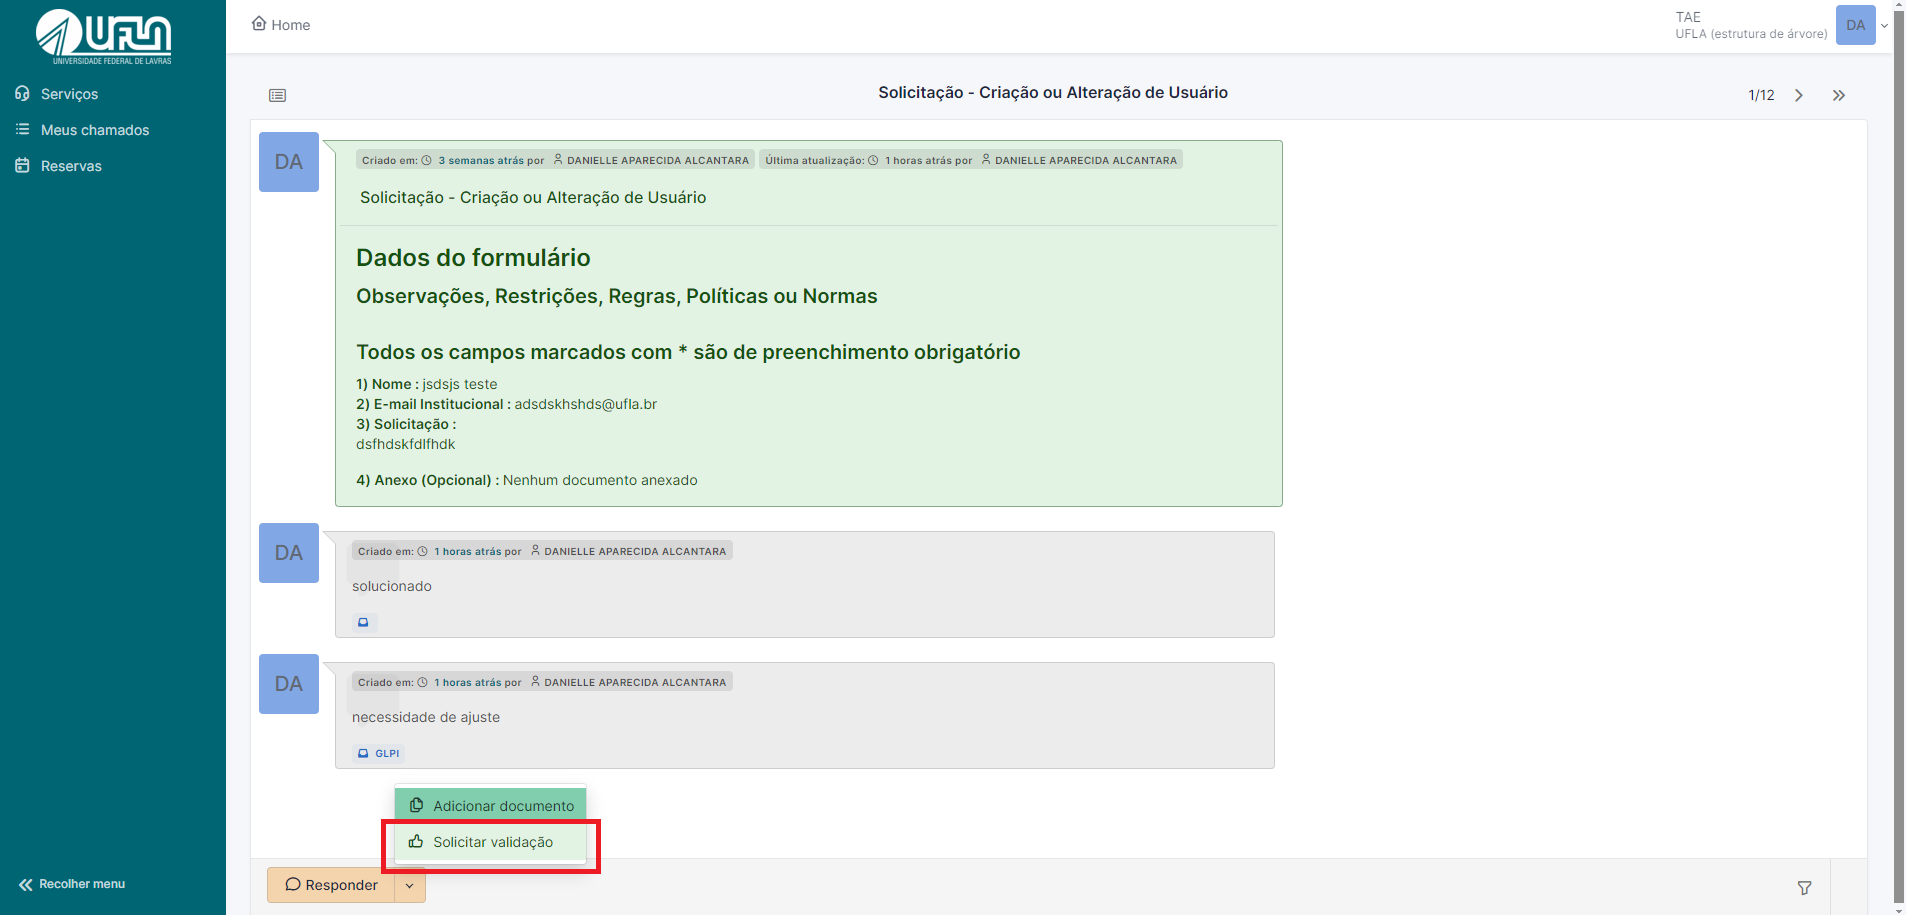
Segunda opção
1. Na aba chamado, em responder clicar na seta.
2. Clicar em solicitar validação
[](https://kb.ufla.br/uploads/images/gallery/2024-09/3GKjOEbvKvPwWJ8J-opcoes-da-acompanhamento-valida.png)
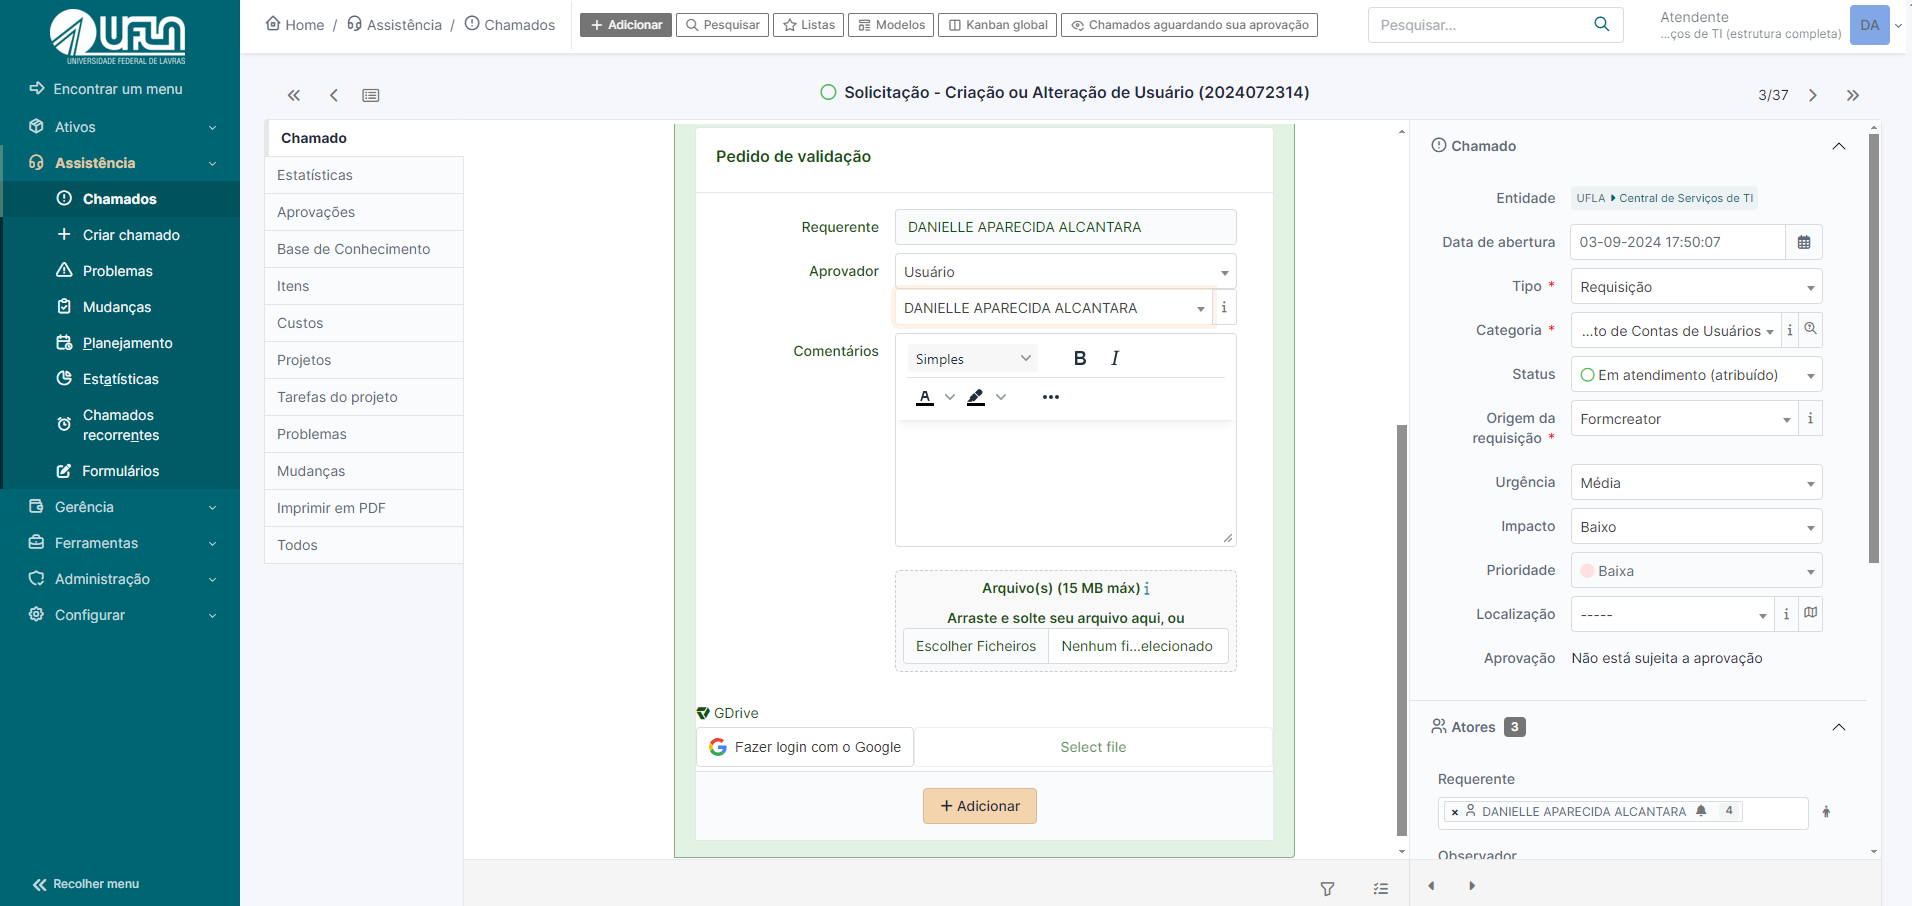
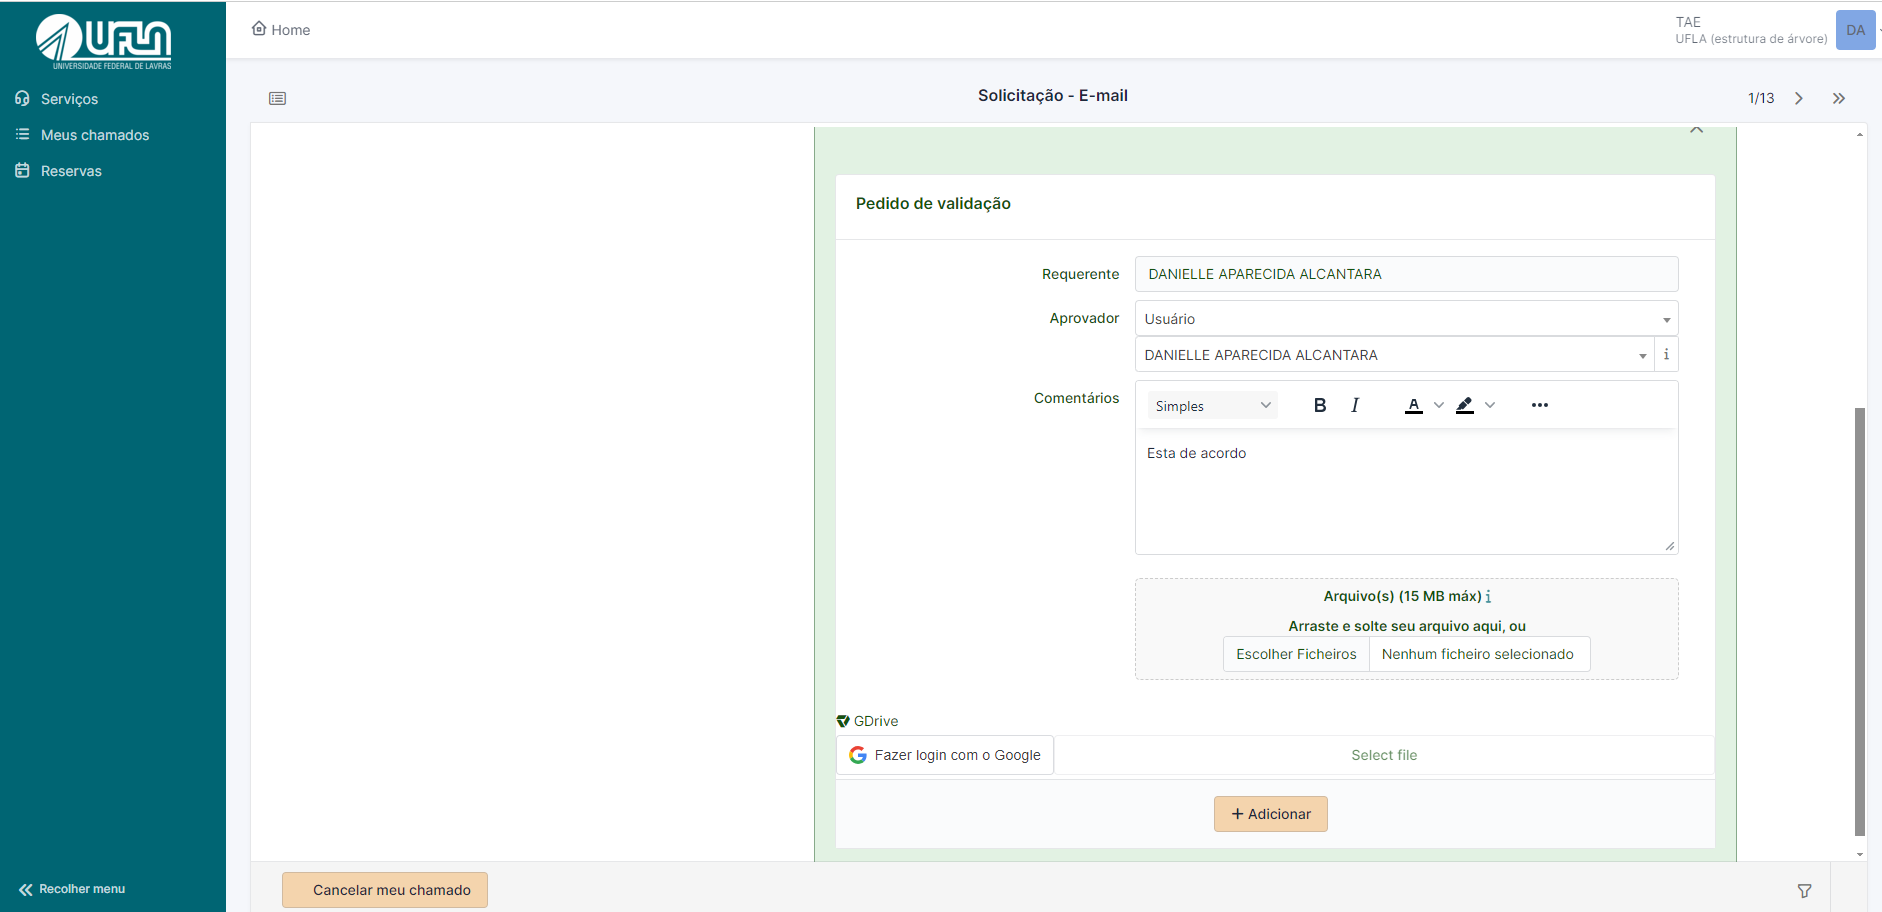
6 .Em aprovador, selecionar o tipo
7.Selecionar usuário do qual necessita-se da autorização;
8.Clicar em adicionar
[](https://kb.ufla.br/uploads/images/gallery/2024-09/WKM7oPdu0FvPf5LD-validacao-com-perfil-de-atendente.png)
Solicitar aprovação com o perfil de solicitante (requisitante)
1. Ao acessar o chamado, em responder clicar na seta.
[](https://kb.ufla.br/uploads/images/gallery/2024-09/Ti9FTSDZszvl0BkW-tela-1.png)
2.Em aprovador, selecionar o tipo
3. Selecionar usuário do qual necessita-se da autorização;
4.Clicar em adicionar
[](https://kb.ufla.br/uploads/images/gallery/2024-09/TeYv0b7hYQMnw5HY-requisitacao-solicita-aprovacao.png)
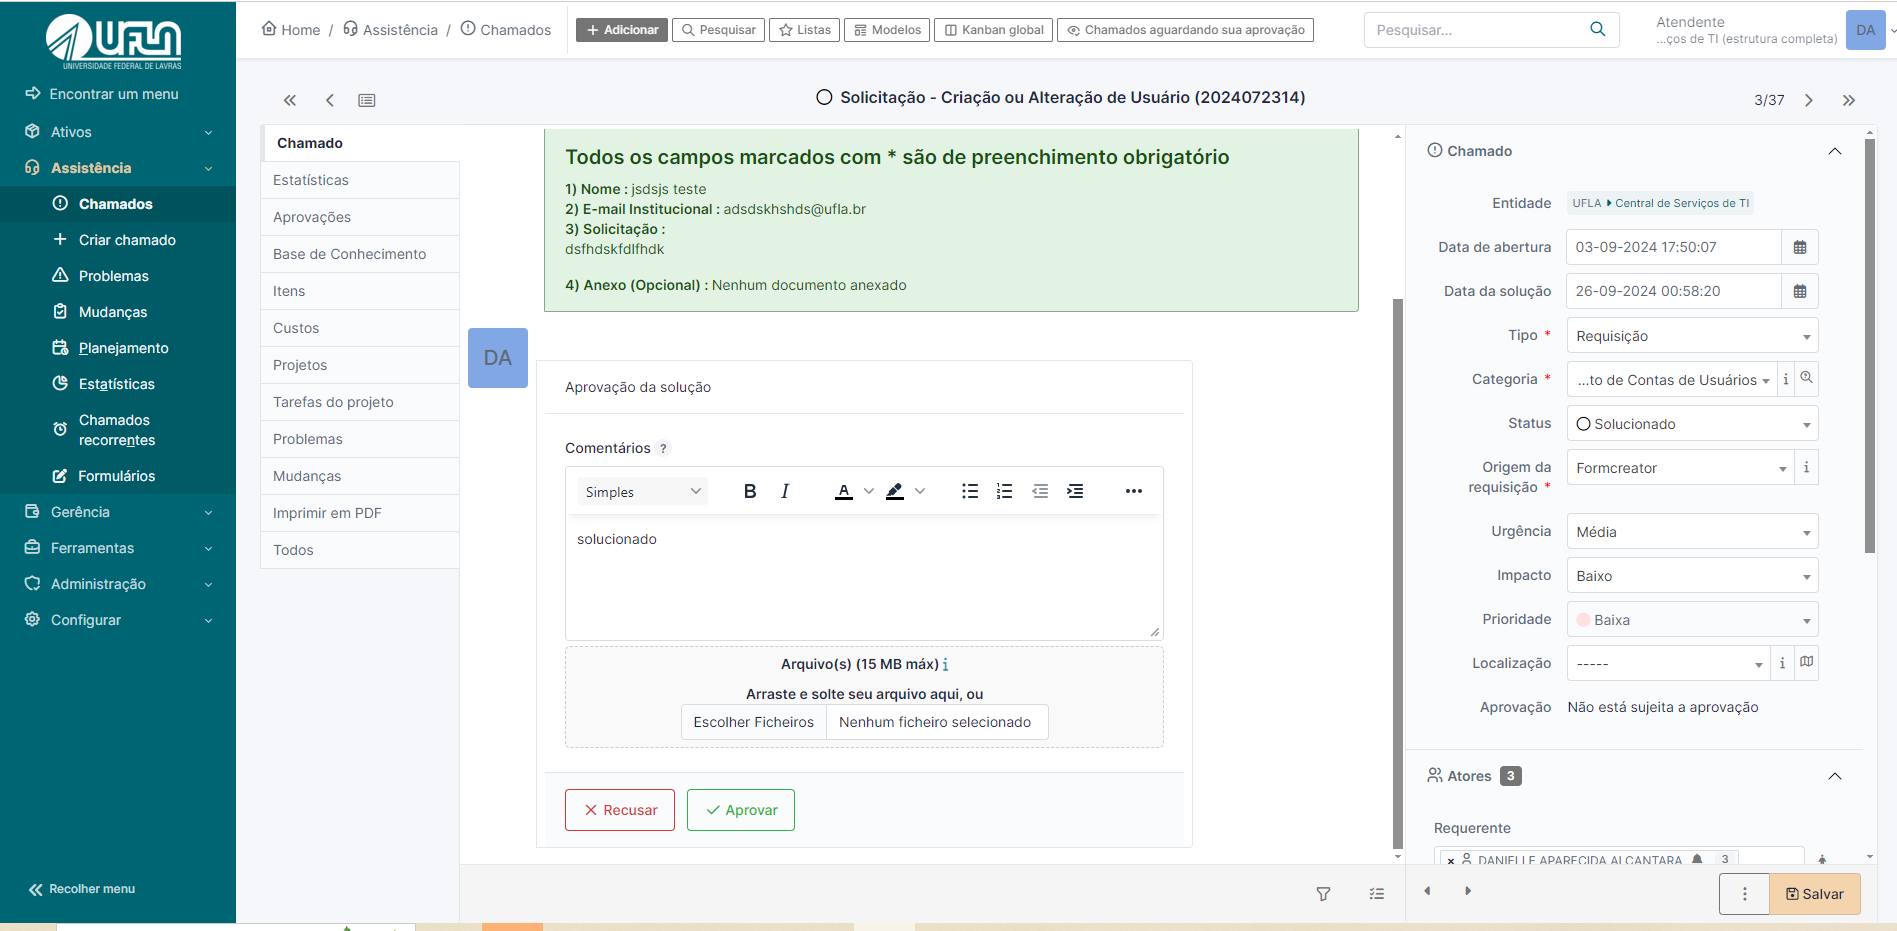
7 - Solucionando um chamado
Para solucionar um chamado é necessário que o mesmo esteja atribuido a um técnico, veja na imagem a seguir. Além disso é necessário acionar a opção "Solucionado" e clicar em salvar
[](https://kb.ufla.br/uploads/images/gallery/2024-09/0FHDbD6XTbUi5Mge-solucao-do-chamado.png)
Em geral, a solução de um chamado deve ser feita pela equipe da Coordenadoria de Operação e Segurança da Informação (COSI). Em vez de inserir uma nota de solução no chamado do GLPI, insira nota de acompanhamento e retorne o respectivo chamado para a última pessoa da COSI que o encaminhou. Caso seja necessário, insira uma nota de acompanhamento, pública, para o solicitante e uma nota de acompanhamento, privada, para a COSI. Desta forma, o solicitante terá conhecimento da solução por meio da nota de acompanhamento pública. A equipe COSI ficará responsável por inserir a nota de solução do chamado.
O chamado pode ser solucionado se julgar que não é necessário retorná-lo para COSI, pois o intuito deste procedimento é manter a equipe de operação, minimamente, informada das mudanças implementadas nos serviços de TI, sem prejudicar a notificação de solução ao solicitante. Mudanças são as alterações em, mas não se limitando a estas: regras de negócios, permissões de acesso, domínios, servidores, estrutura de página, inclusão de grupo de usuários, relatórios e procedimentos de operação.
8 - Enviando tarefas para um colega, a partir de um chamado
Quando lhe for atribuído um chamado cuja solução necessita de uma pequena intervenção de um colega, você pode criar uma tarefa para essa pessoa em vez de lhe atribuir o chamado. A tarefa funciona como um chamado, mas está num chamado específico. A imagem a seguir ilustra a opção para criação de tarefa em um chamado:
1. Em responder, na seta clicar em ‘criar tarefa’
[](https://kb.ufla.br/uploads/images/gallery/2024-09/zZXu3TWI2rMg2LJm-opcoes-da-acompanhamento.png)
2. Selecionar descrever a tarefa e selecionar o técnico ao será designada.
3.Caso, seja uma tarefa na qual o requisitante não deve ter acesso, marque a opção do cadeado
[](https://kb.ufla.br/uploads/images/gallery/2024-09/gX3u02HQYMAAxZHH-criacao-de-tarefa.png)
Como mencionado anteriormente, as tarefas são exibidas na seção “Tarefas de chamado para fazer” da página inicial do GLPI.
Consideremos que um técnico receba um chamado no GLPI solicitando a manutenção de um computador, em que será necessário trocar peças, entretanto a aquisição de peças é com outro técnico. Nesse contexto, o técnico cria uma tarefa no chamado e atribui ao outro técnico responsável por fazer a aquisição. Recomenda-se que o estado da tarefa seja “A FAZER”.
O técnico conclui a tarefa clicando na “caixa de seleção” referente à tarefa ou selecionando a opção “FEITO” no estado da tarefa, no modo de edição da respectiva tarefa.
[](https://kb.ufla.br/uploads/images/gallery/2024-09/3lM2RDKzvJTPJHP7-tarefa-feita.png)
Quando o técnico acessa a tarefa no modo edição, que está atribuída para ele, é possível acionar um contador de tempo que vai registrar o tempo gasto para atender aquela tarefa. A contagem do tempo de empenho na tarefa inicia quando o botão "verde" é acionado. O sistema aciona um cronômetro após iniciar a tarefa.
Vale ressaltar que o GLPI permite acionar somente uma tarefa por vez. Com isso, para trabalhar em uma segunda tarefa é necessário “PAUSAR” a primeira e em seguida “INICIAR” a segunda tarefa. A tarefa é concluída ao clicar na opção “FEITO”.
As tarefas atribuídas a você são exibidas no painel inicial do GLPI, na mesma tela onde são exibidos os chamados atribuídos a você. Dessa forma é necessário consultar periodicamente se há tarefas atribuídas na seção “Tarefas de chamado para fazer”, conforme ilustra a imagem a seguir:
[](https://kb.ufla.br/uploads/images/gallery/2024-09/RfedIlPIMFRKSu4O-tarefas-a-fazer.png)
9 - Consultar chamados
Para consultar chamados basta acessar o caminho “Assistência >> Chamados”, na tela exibida é possível fazer diversas combinações de filtros. Vale ressaltar para uso dos filtros que o solicitante é descrito como requerente e o atendente é descrito nos filtros como técnico.
[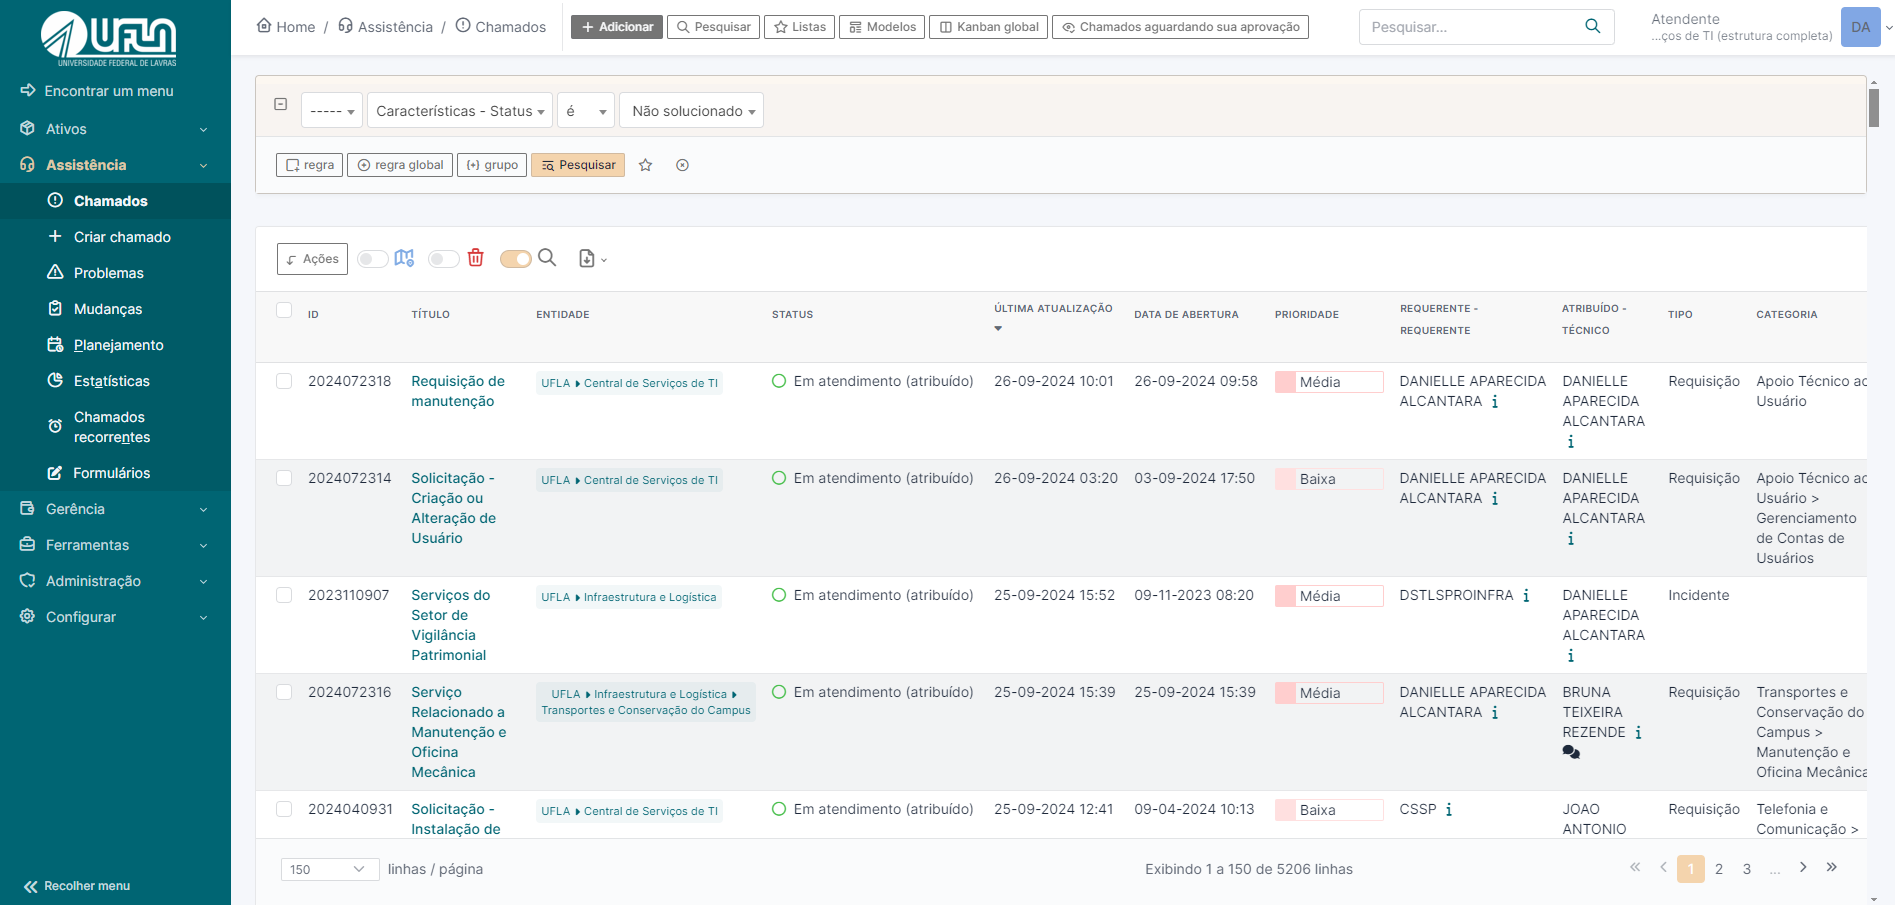](https://kb.ufla.br/uploads/images/gallery/2024-09/MTiuZtuJs4rLMxaC-captura-de-tela-2024-09-26-091554.png)
10 - Criar um chamado para terceiros
O GLPI permite criar chamadas para terceiros, inclusive para você, portanto é necessário acessar o caminho “Assistência >> Criar Chamado”
[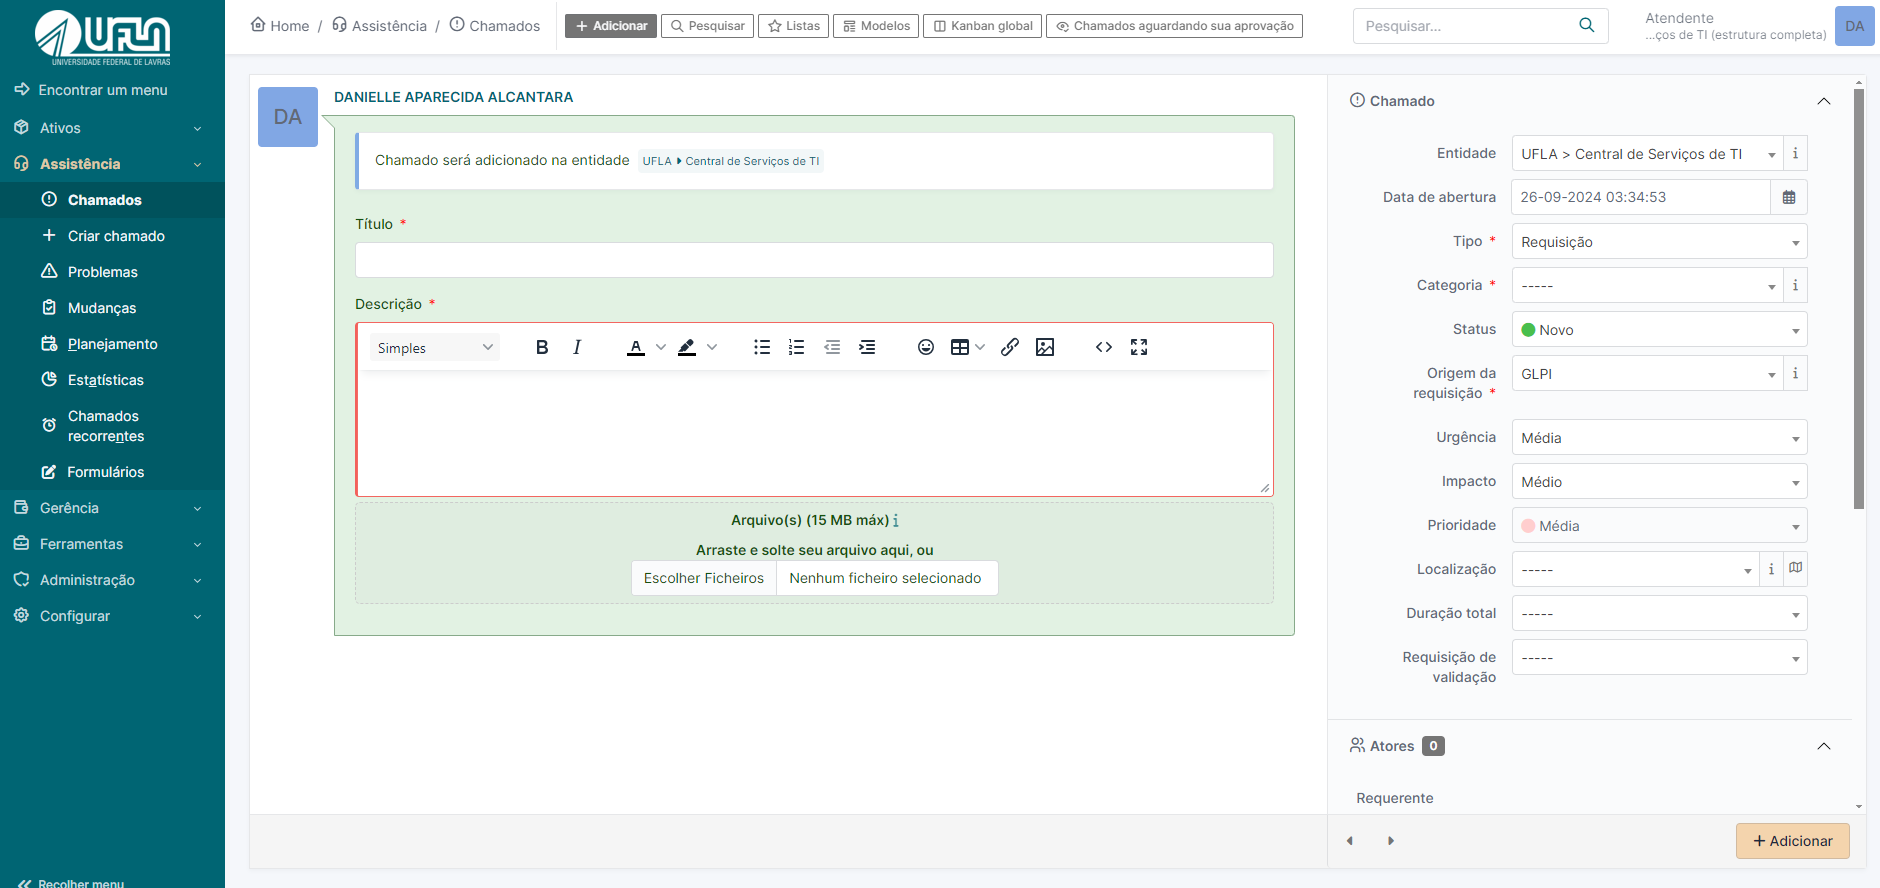](https://kb.ufla.br/uploads/images/gallery/2024-09/Z5xzodcvTR6A0HGI-criar-chamado.png)
Na criação do chamado é necessário se atentar nos campos: “Requerente” (Selecionar o nome do usuário para o qual esta abrindo o chamado ), “Tipo” (requisição ou incidente), “Categoria” (categoria de serviço do GLPI, pre-requisitios para abertura do chamado) e para quem será “Atribuído”( por padrão, autoatribuido ao perfil de atendente que cria o chamado .
Na criação do chamado, é importante prestar atenção aos seguintes campos: 'Requerente' (selecionar o nome do usuário para quem o chamado está sendo aberto), 'Tipo' (escolher entre requisição ou incidente), 'Categoria' (categoria de serviço do GLPI, campo obrigatório para a abertura do chamado) e 'Atribuído' (por padrão, o chamado é autoatribuído ao atendente que o cria)
11 - Informações gerais
- O GLPI notifica por e-mail sobre todas as ocorrências nos chamados.
12 - Alteração de perfil
Usuários com mais de um perfil podem alternar entre eles acessando a opção no canto superior direito da tela.
[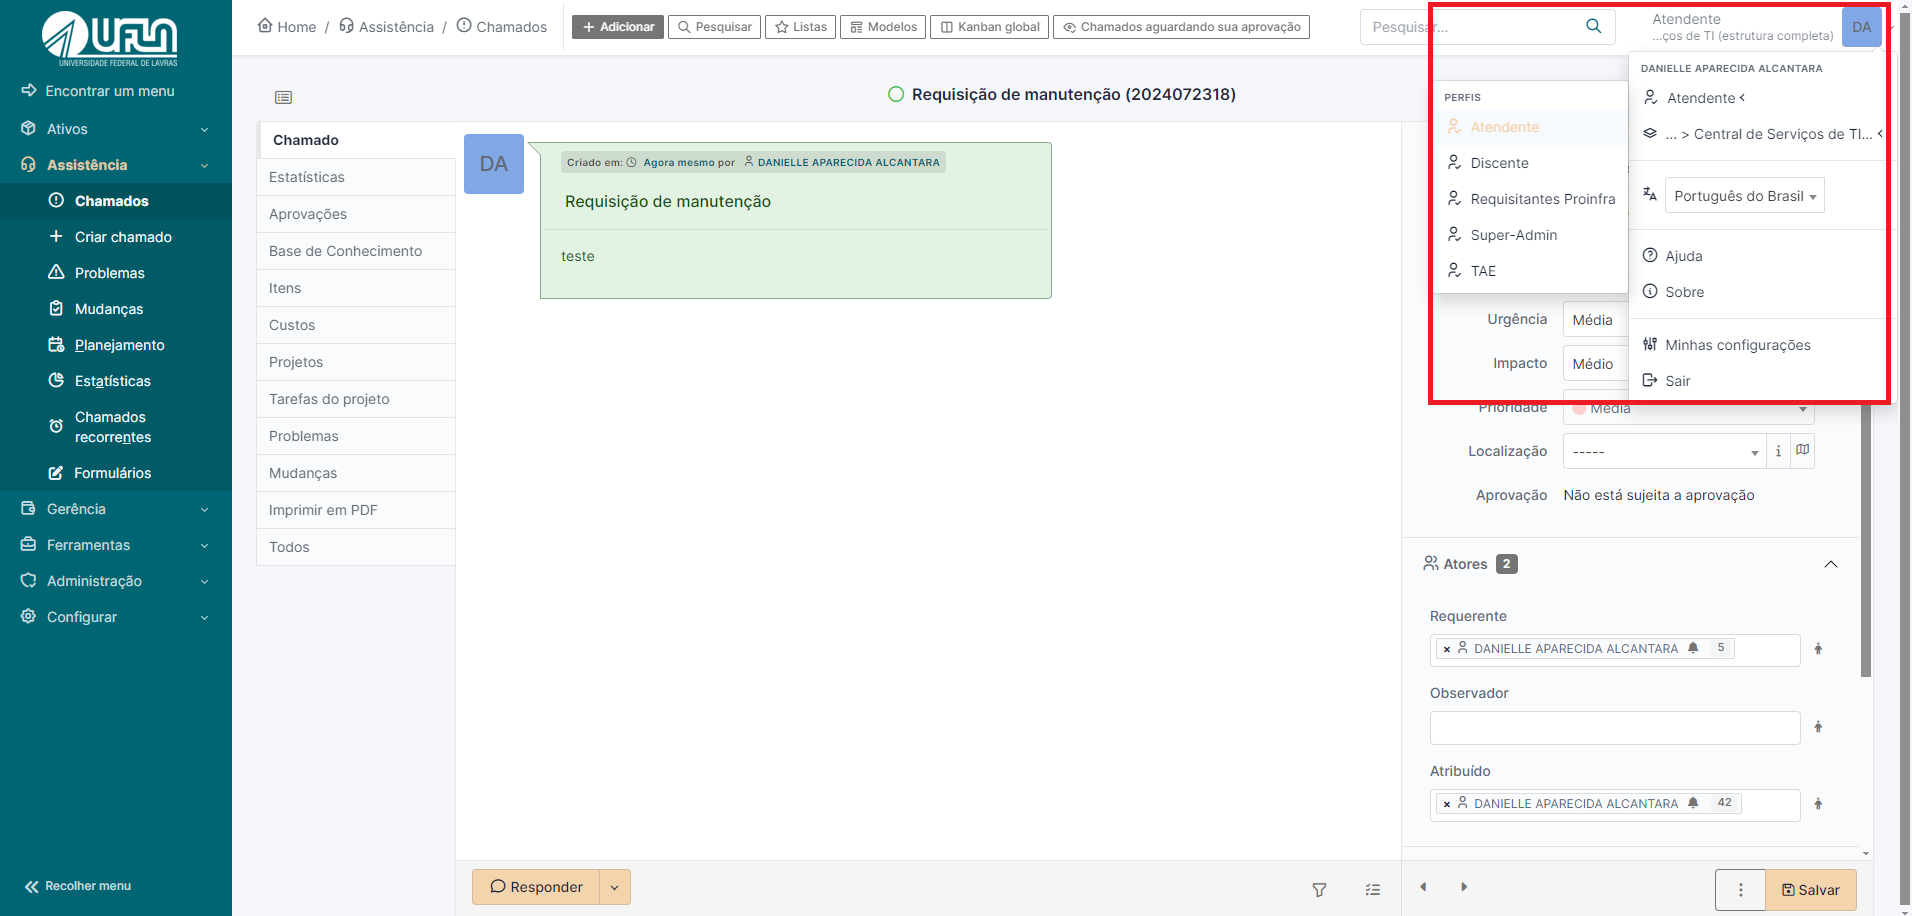](https://kb.ufla.br/uploads/images/gallery/2024-09/BUN1Y5etObncYHkt-alteracao-de-perfil.png)
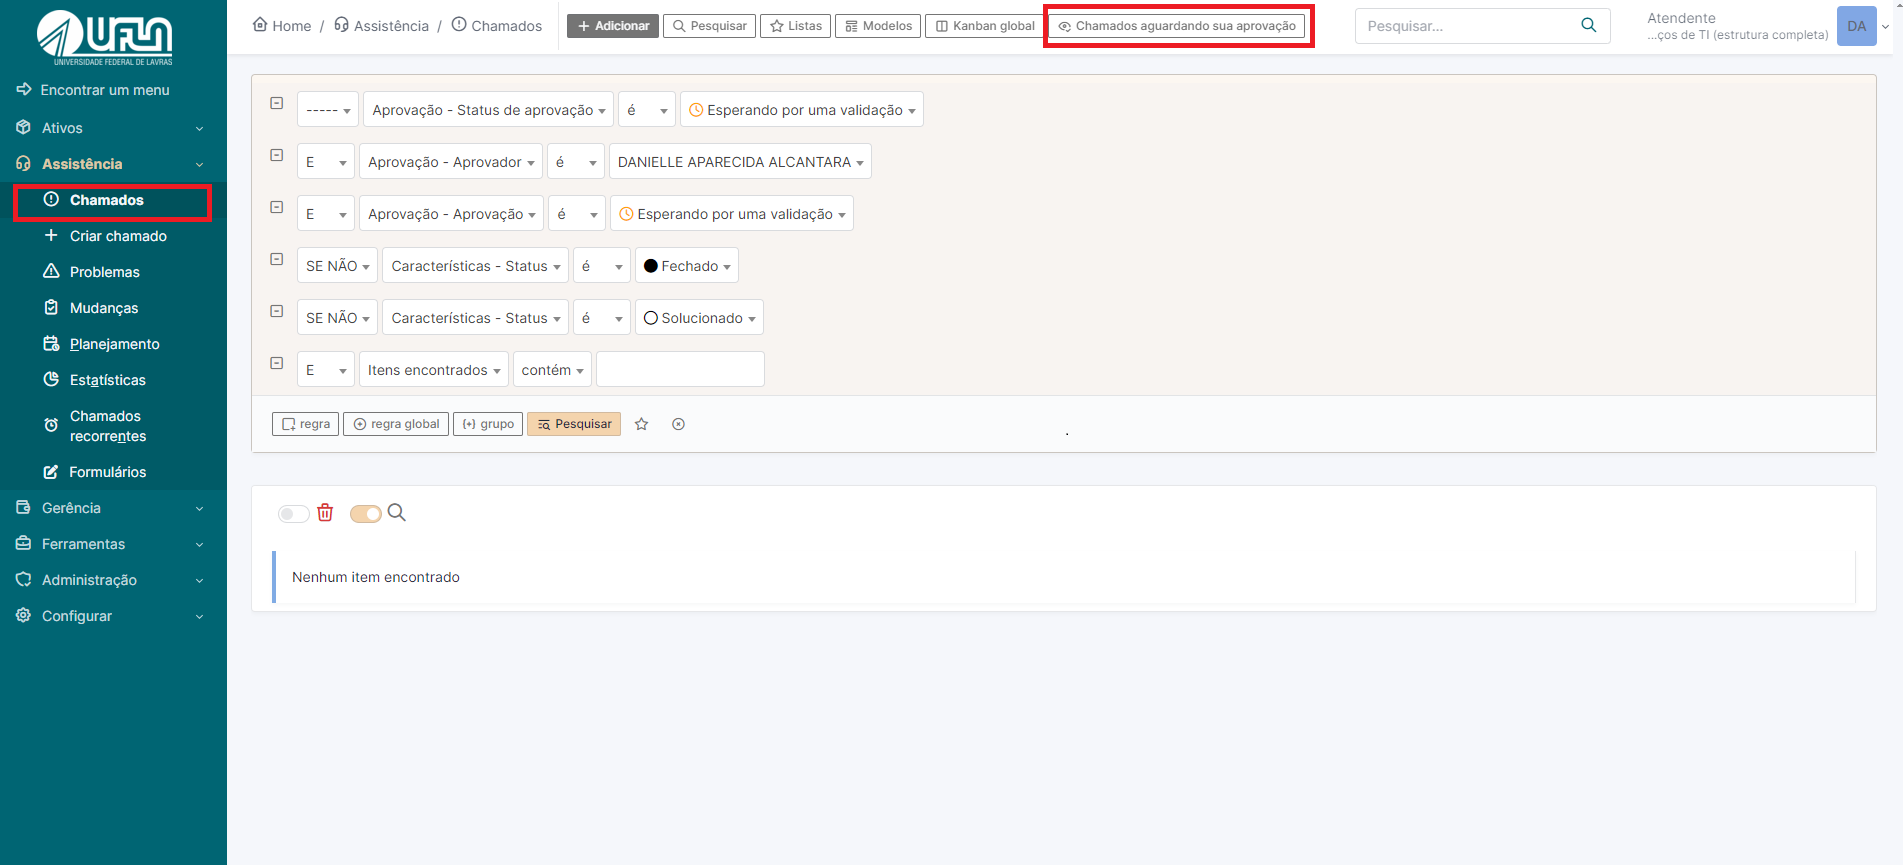
13 - Identificar chamados aguardando sua aprovação
Acesse a aba assistência, clicar em “chamado” e na sequencia em “chamados aguardando sua aprovação”. Assim, serão listados o chamados que estão neste contexto, com o perfil de atendente.
[](https://kb.ufla.br/uploads/images/gallery/2024-09/sANpJ4gEFUp4oNC1-aguardando-aprovacao.png)
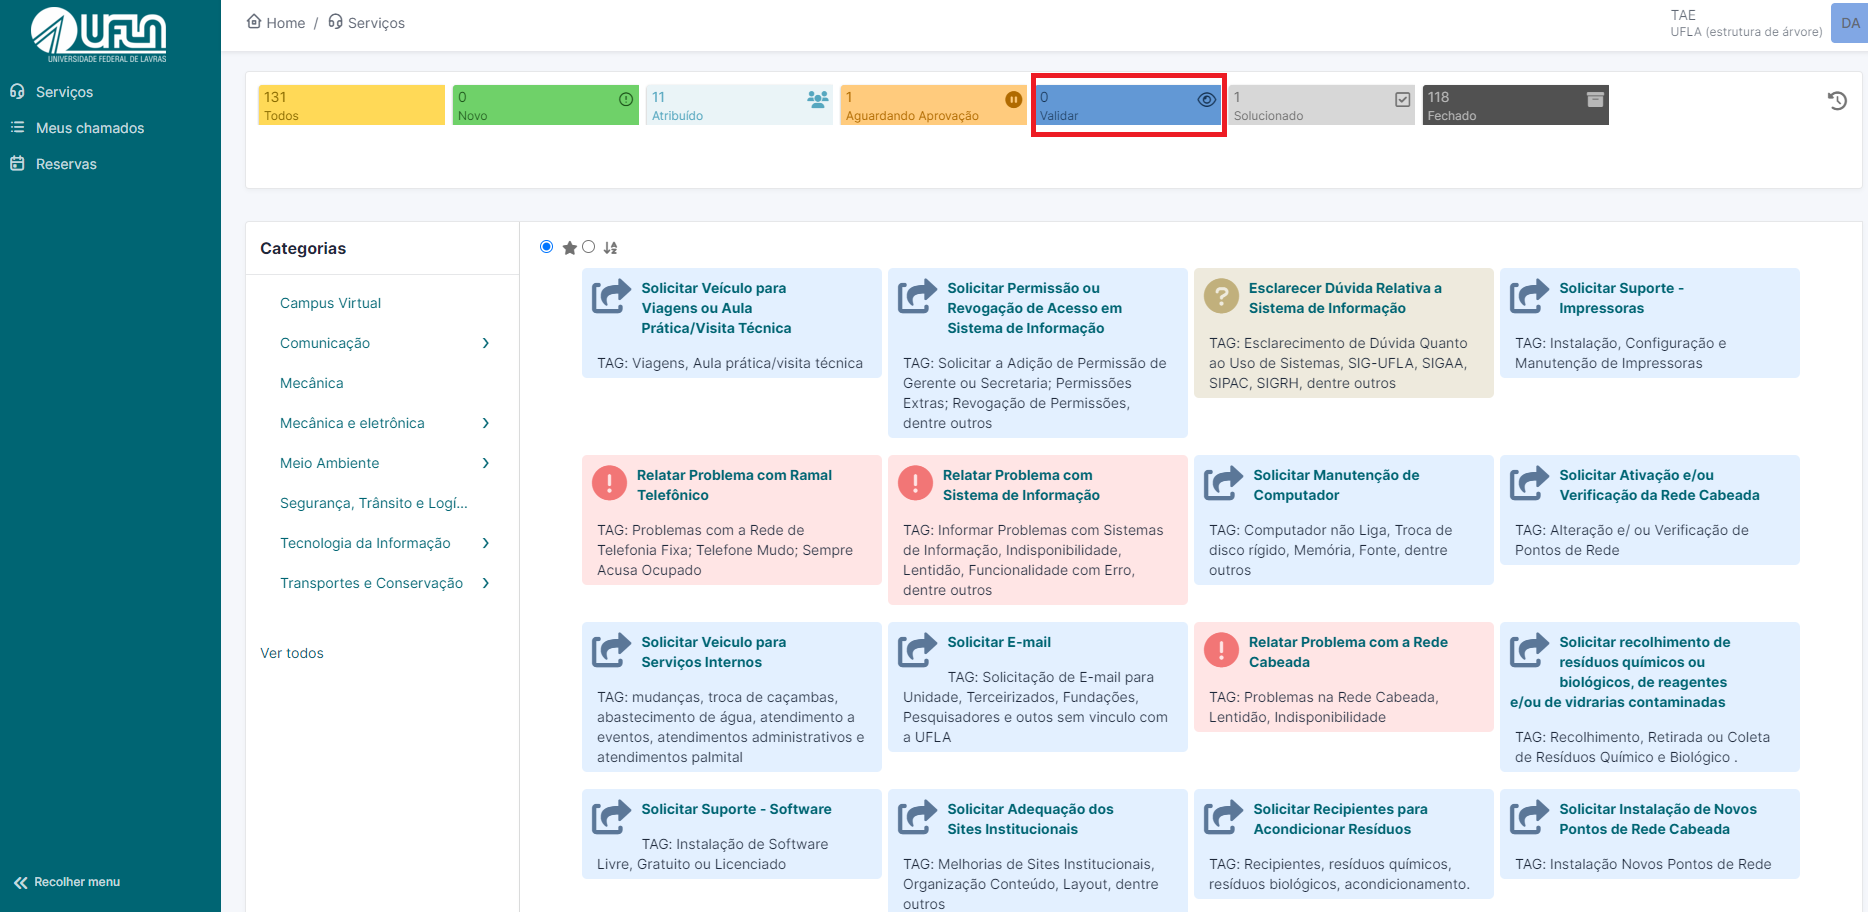
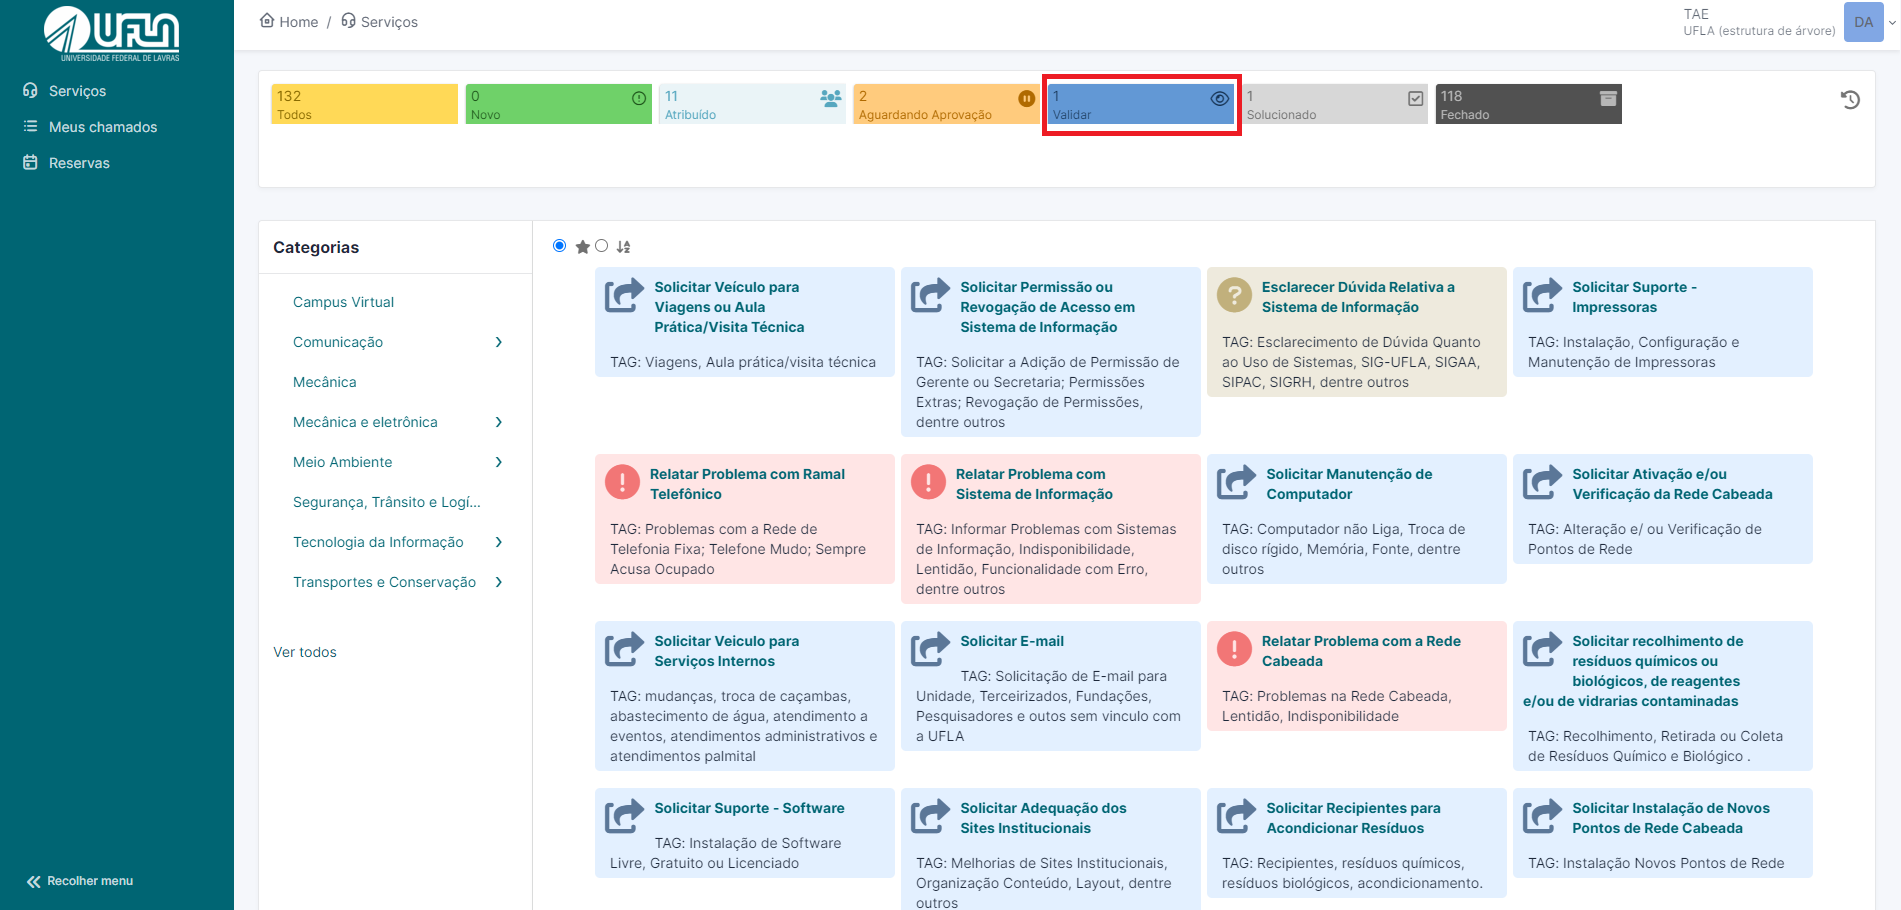
14 - Validar um chamado
Para validar um chamado acessando com os perfis de TAE ou docente, deve-se clicar em “validar” e em seguida clicar no chamado desejado.
[](https://kb.ufla.br/uploads/images/gallery/2024-09/QUathN49pBryTzF1-perfil-tae.png)
# Como interagir com meus chamados - "Tutorial para solicitantes"
**Como você pode solicitar aprovação para seu chamado**
1. Ao acessar o chamado, em responder clicar na seta.
[](https://kb.ufla.br/uploads/images/gallery/2024-09/UHvwYdo53JxjOR5X-tela-1.png)
2. Em aprovador, selecionar o tipo
3. Selecionar usuário do qual necessita-se da autorização;
4. Clicar em adicionar
[](https://kb.ufla.br/uploads/images/gallery/2024-09/ao1ZyjTEoLhshotK-requisitacao-solicita-aprovacao.png)
#### **Como aprovar o chamado**
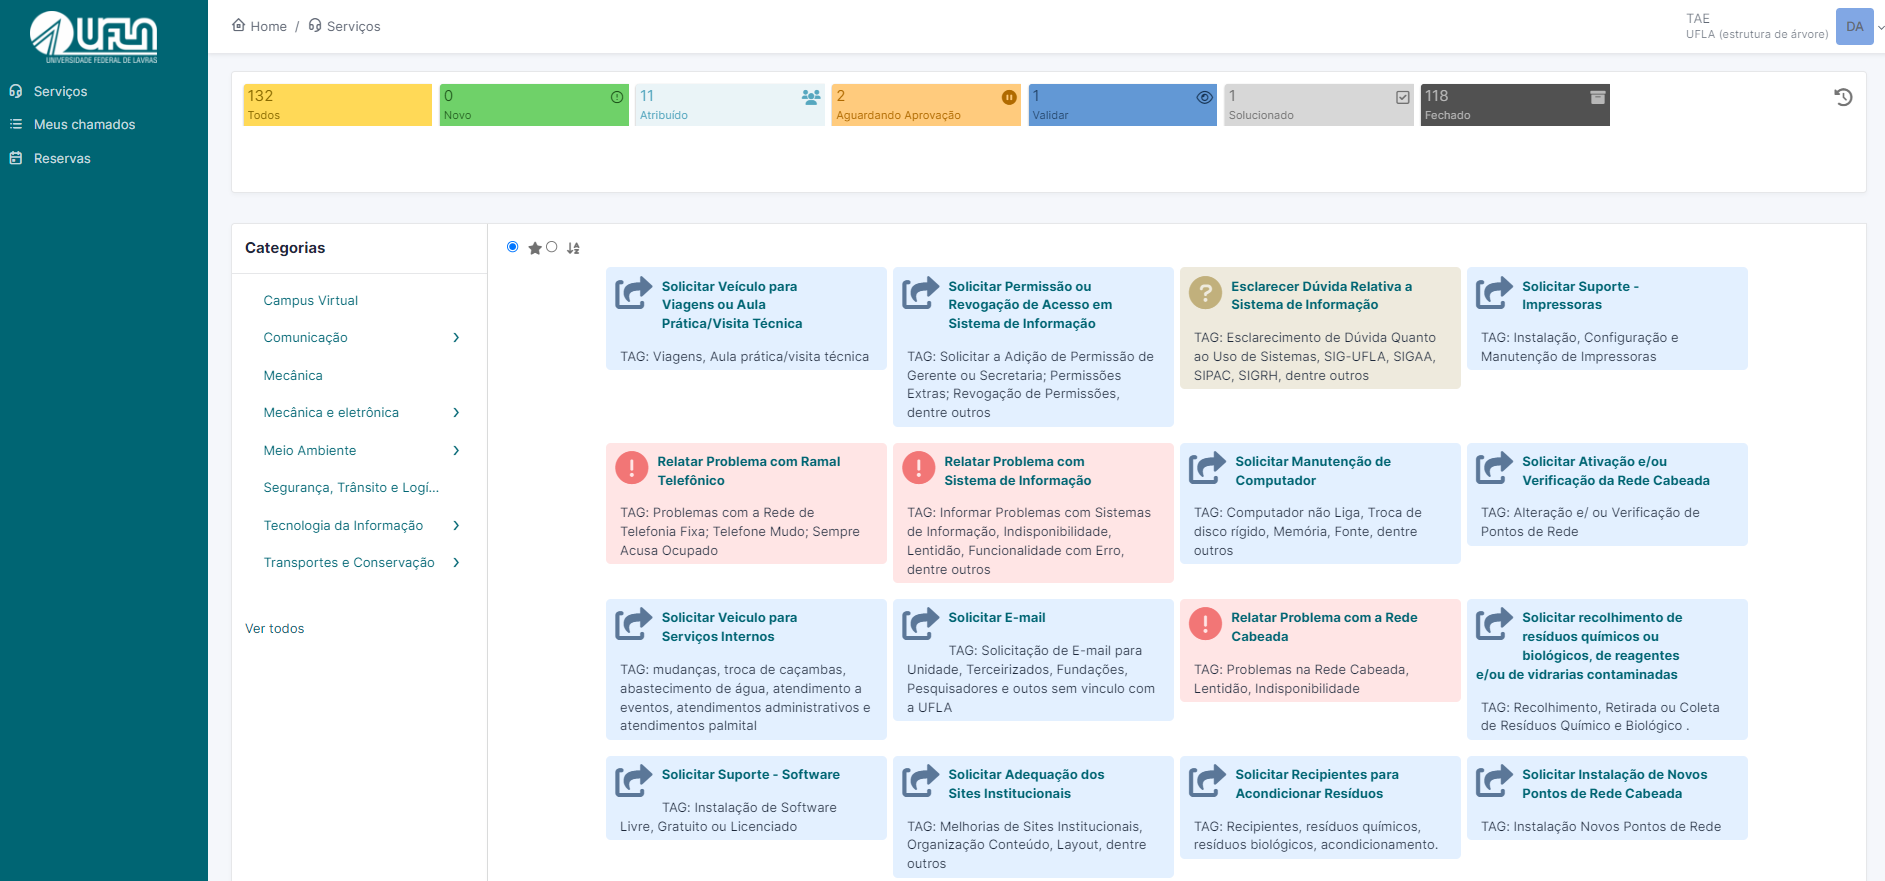
Na tela inicial, na parte superior, clicar em "validar"
[](https://kb.ufla.br/uploads/images/gallery/2024-09/sSQ4uSOmIkcQYtdj-validar-e-aprovar.png)
Na lista de aberta, clicar no chamado que deseja avaliar
[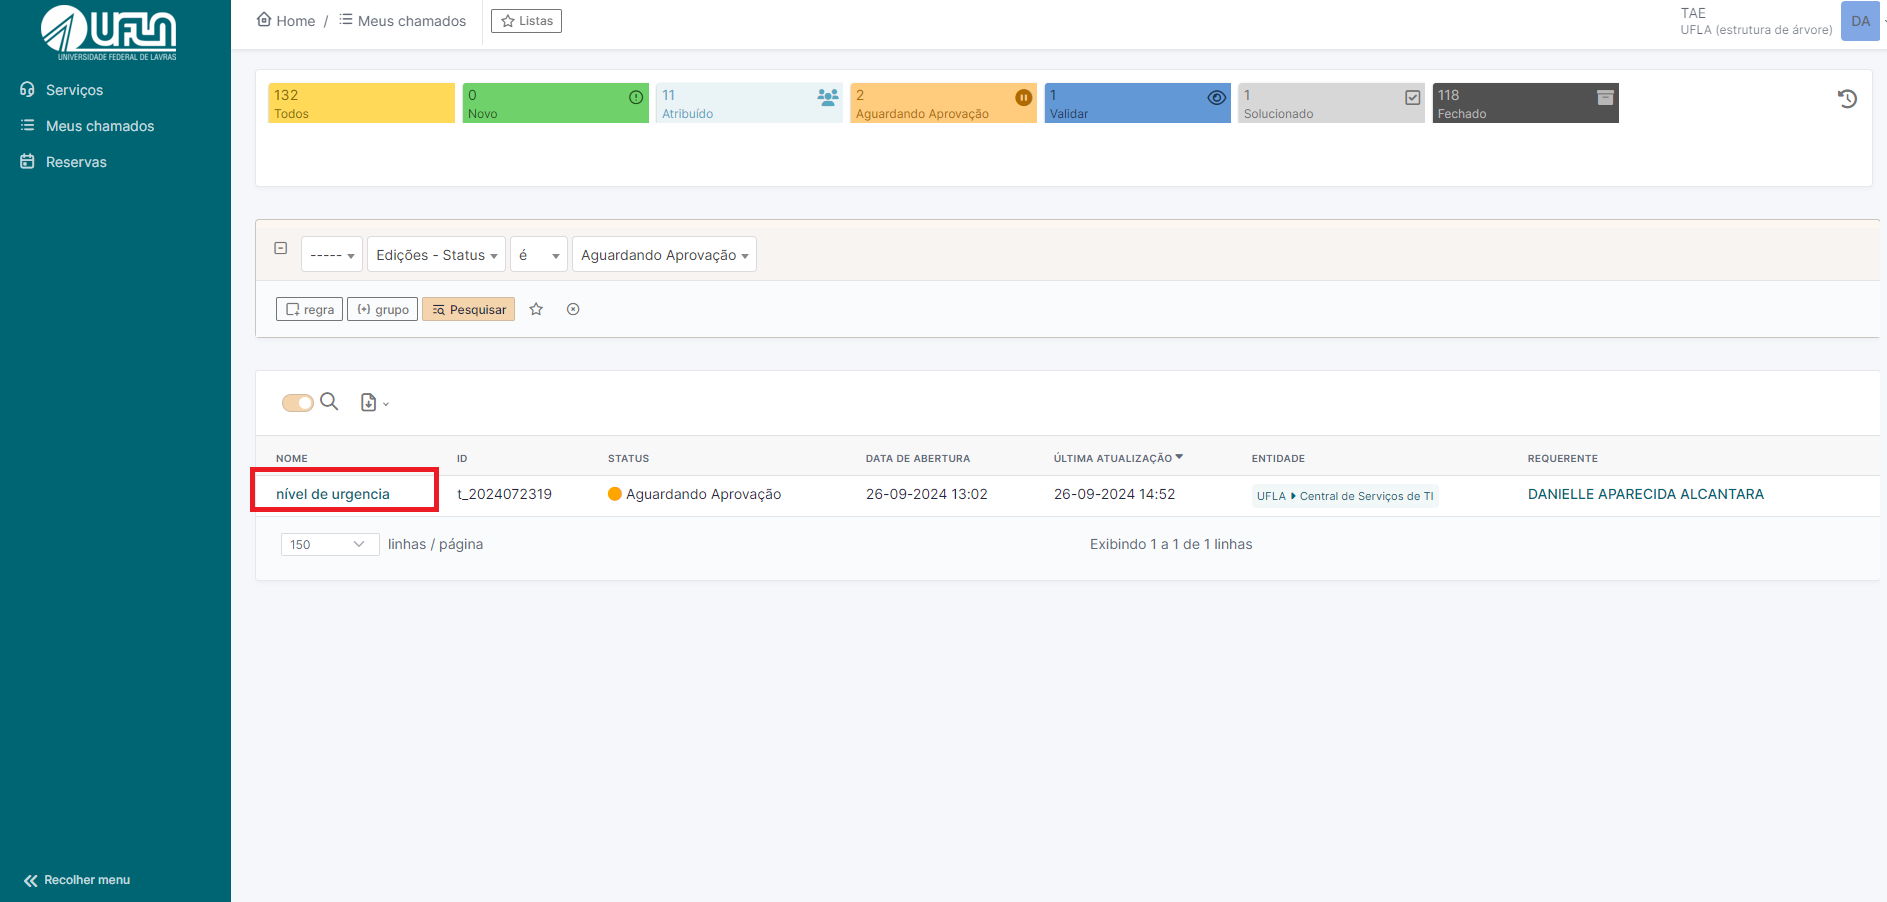](https://kb.ufla.br/uploads/images/gallery/2024-09/4D64OxnnLjZbaR8H-valida-escolher-chamado.png)
Incluir a justificativa e clicar em aprovar ou recusar.
[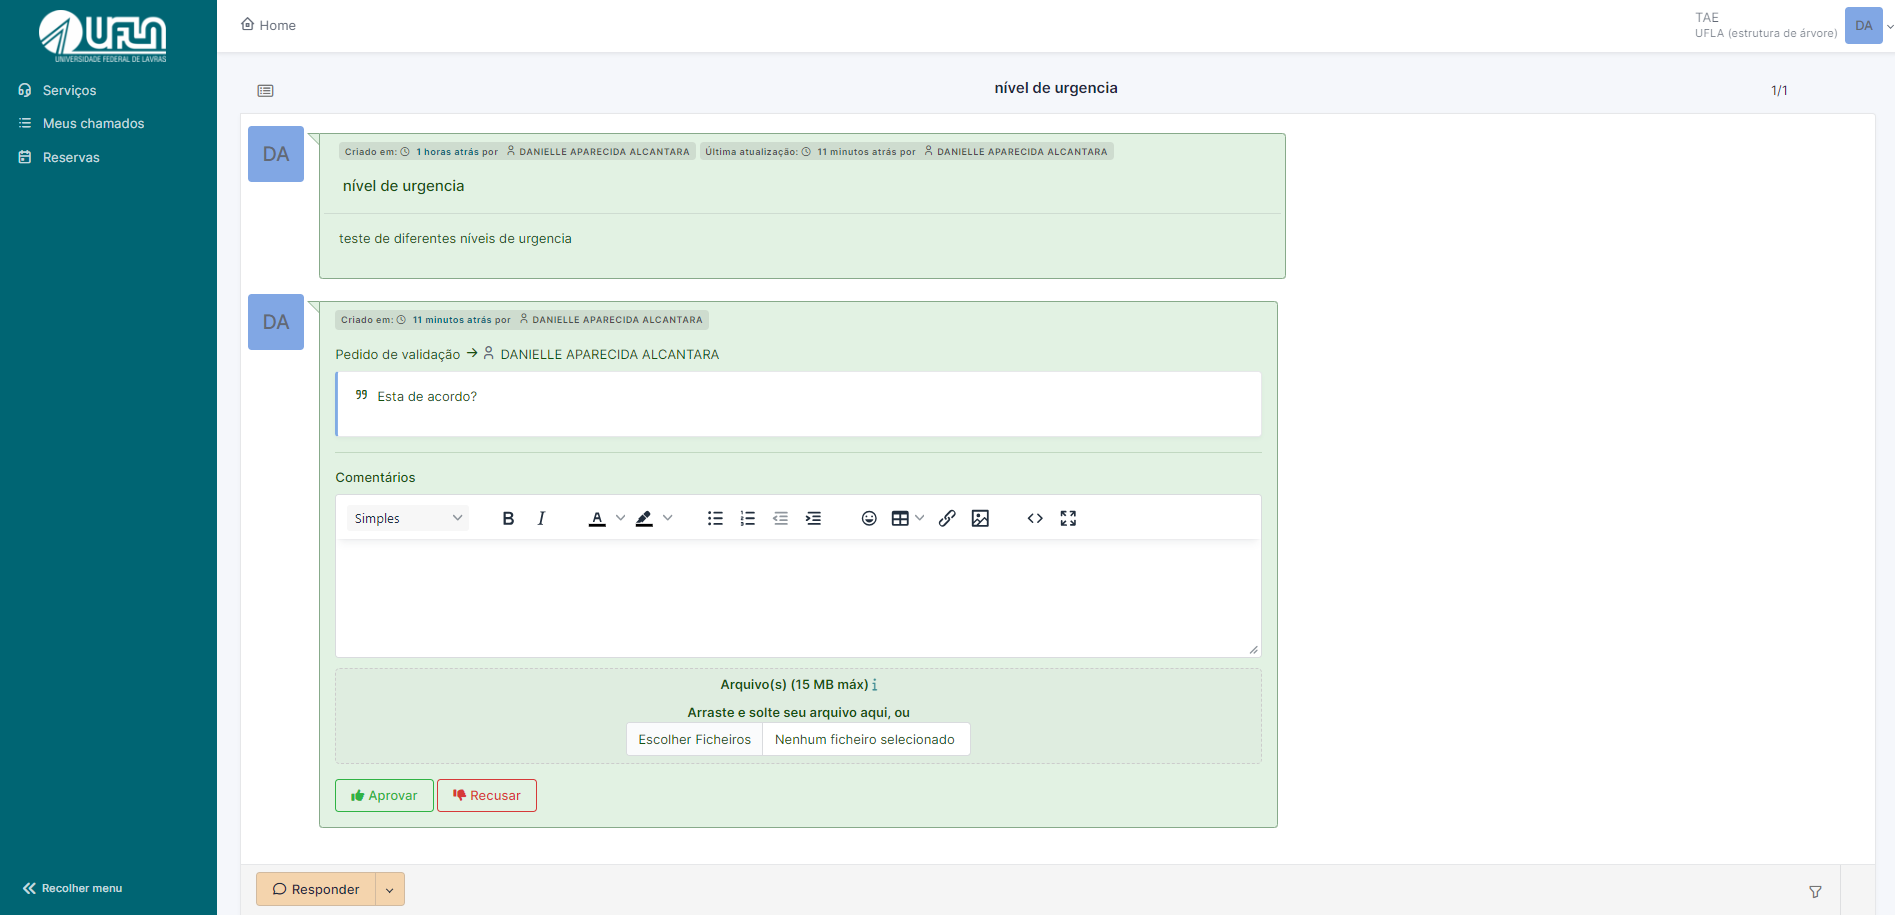](https://kb.ufla.br/uploads/images/gallery/2024-09/xq5WQ0Hu0h2Qq7yE-aprovar111.png)
Como consultar um chamado
Há duas opção para acessar seus chamados:
Clicando em "Meus chamados"
[](https://kb.ufla.br/uploads/images/gallery/2024-09/ODazN02N9nbkcKCG-navegacao.png)
Clicar no chamado desejado
[](https://kb.ufla.br/uploads/images/gallery/2024-09/9s9HKO6XGOArP6Tp-navega1.png)
Segunda opção de acesso aos seus chamados
Na tela inicial, no parte superior é possível identificar os status dos chamados.
[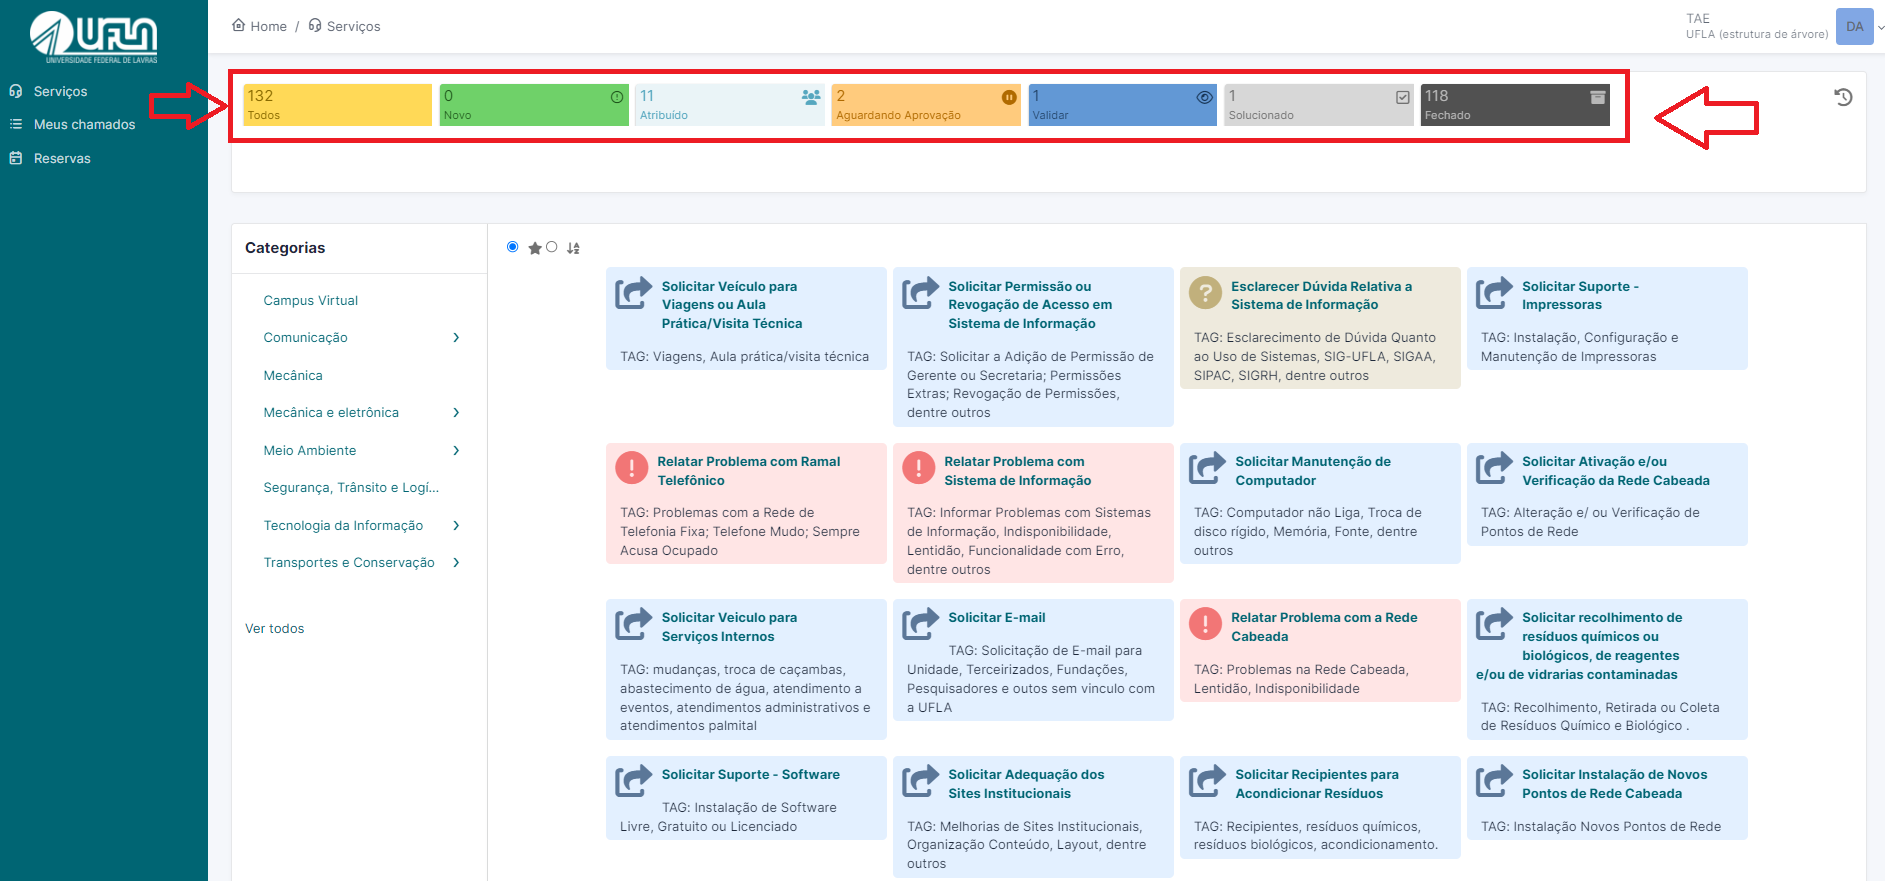](https://kb.ufla.br/uploads/images/gallery/2024-09/ALAGFGyPxMmgZMEb-navegacao222.png)
Como encontrar um formulário para abrir um chamado (colocar como o usuário pode navegar na hierarquia de formulários.).
Cancelado de chamado pelo próprio solicitante
# Glossário
**Suporte de Nível 1**: A equipe do Suporte de Nível 1 é formada por profissionais capazes de atender, de forma preliminar, chamados de dúvidas quanto ao uso de sistemas, incidentes, manutenção de computadores e realizar suporte técnico remota ou presencialmente. Caso o Suporte de Nível 1 não consiga atender um chamado, ele poderá ser encaminhado para o Suporte de Nível 2. O Suporte de Nível 1 é prestado pela Coordenadoria de Operações e Segurança da Informação (COPS)
**Suporte de Nível 2**: A equipe do Suporte de Nível 2 tem mais conhecimento sobre os processos de negócio, sobre o funcionamento dos sistemas de informação e sobre os equipamentos e sistemas do datacenter, das redes cabeadas e sem fio e da telefonia. Caso o Suporte de Nível 2 não consiga atender um chamado, ele poderá ser encaminhado para o Suporte de Nível 3. A Coordenadoria de Sistemas de Informação (CSI) é responsável pelo provimento do Suporte de Nível 2 e 3. A Coordenadoria de Infraestrutura Computacional (CIC) é responsável pelo provimento do Suporte de Nível 2 e 3 relativos às questões de infraestrutura de TI que afetam sistemas de informação e sites institucionais.
**Suporte de Nível 3**: O Suporte de Nível 3 é formado por profissionais detentores do conhecimento mais avançado sobre os sistemas de informação e demais sistemas e equipamentos contemplados pela Central de Serviços. Este nível de suporte poderá ser realizado pela equipe interna (por exemplo, equipe de desenvolvimento de software, equipe de banco de dados, equipe de campo da infraestrutura, etc.) ou por empresas terceirizadas. A Coordenadoria de Sistemas de Informação (CSI) é responsável pelo provimento do Suporte de Nível 2 e 3. A Coordenadoria de Infraestrutura Computacional (CIC) é responsável pelo provimento do Suporte de Nível 2 e 3 relativos às questões de infraestrutura de TI que afetam sistemas de informação e sites institucionais.
**Tipo de chamado:** classificação da requisição feita pelo cliente
- **Requisição**: solicitação padrão para demandas que não geram indisponibilidade em sistema
- **Incidente**: quando existe alguma indisponibilidade do sistema que impede a execução das atividades do cliente
**Status do chamado:**
- **Novo**: a solicitação foi aberta pelo cliente e entra na fila para que possa ser atendido pelo suporte nível 1
- **Processando (Atribuído)**: quando a solicitação é atribuída para o responsável analisar a demanda
- **Processando (Planejado)**: quando a solicitação foi analisada pela equipe e está em processo de implementação
- **Pendente**: quando existe alguma necessidade de informação por parte do requisitante que precisa ser esclarecida
- **Solucionado**: a solicitação foi concluída
- **Fechado**: a solicitação foi concluída e direcionada para o cliente que poderá aceitar ou não a solução implementada
# Processo de atendimento
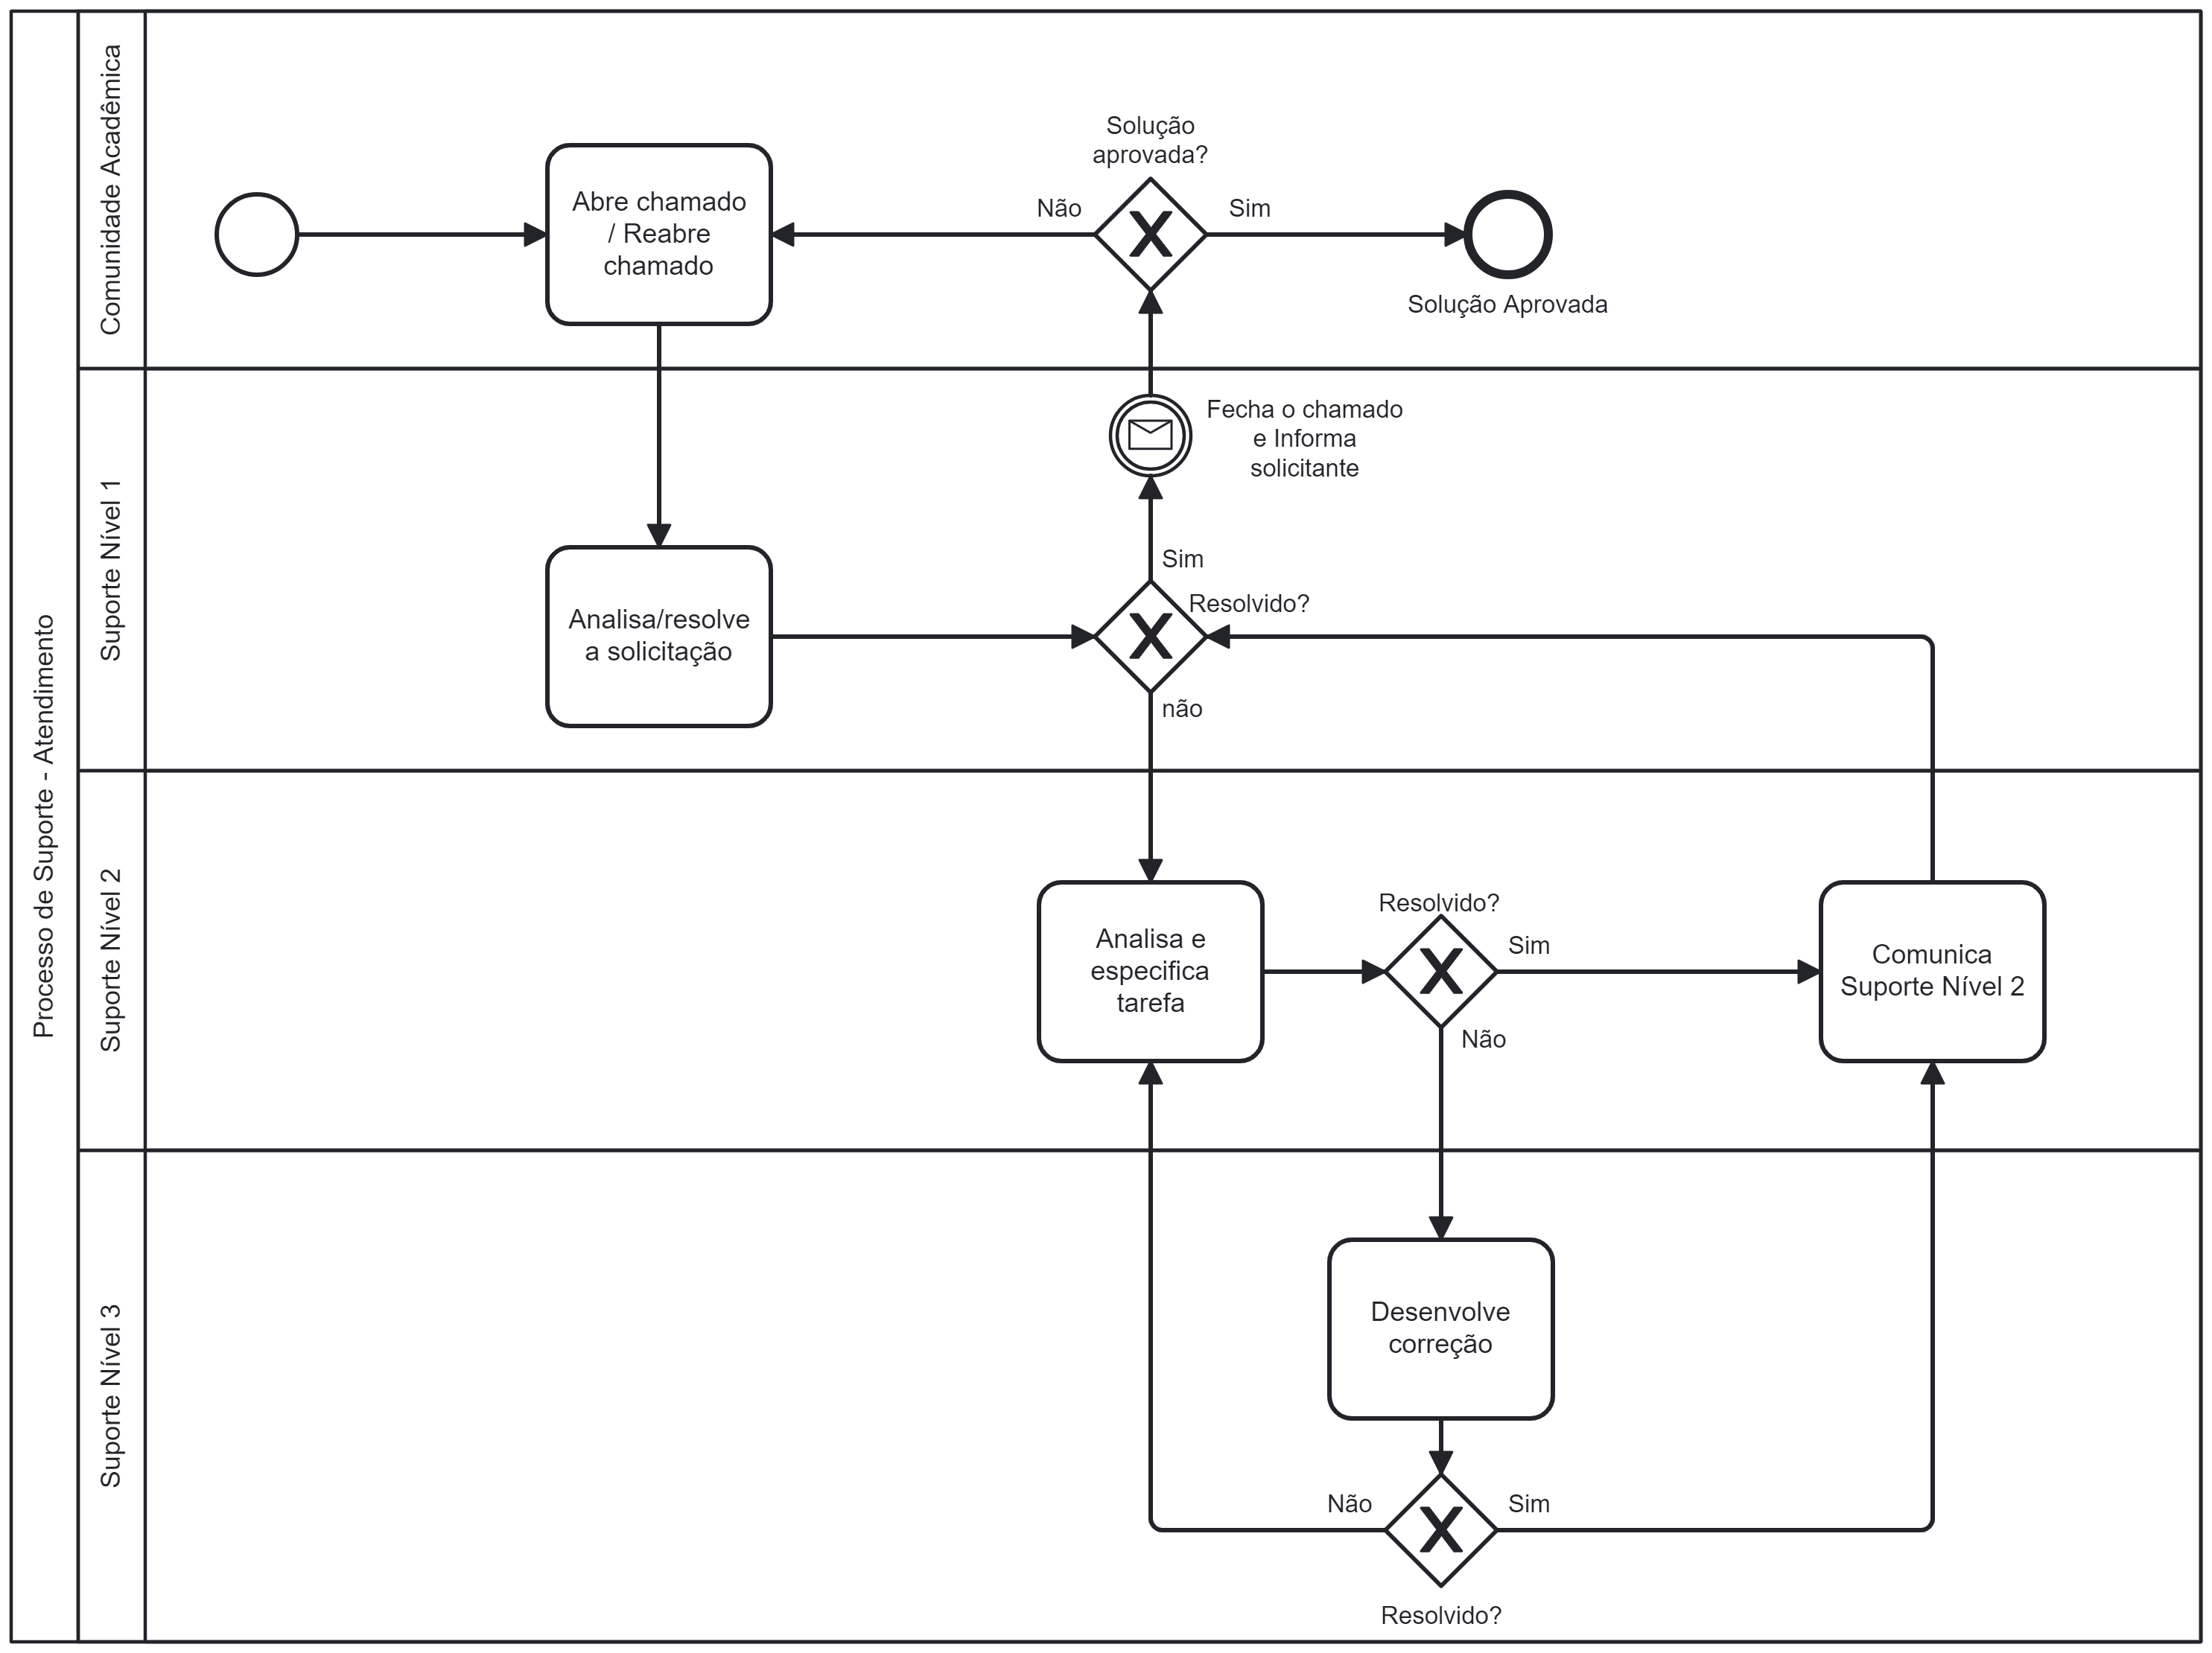
**ETAPAS DE ATENDIMENTO:**
1. Chamado é aberto/reaberto pelo solicitante no Sistema da Central de Serviços Compartilhado (GLPI)
2. **Suporte Nível 1** analisa a solicitação e procede com a correção do problema/orientação.
3. Caso não consiga resolver, **Suporte Nível 1** repassa a demanda ao **Suporte Nível 2**
4. **Suporte Nível 2** atua na resolução do problema
5. Caso não consiga resolver, uma tarefa é especificada no Sistema de Gestão de Projetos para o **Suporte Nível 3**
6. **Suporte Nível 3** atua na resolução do problema.
7. **Suporte Nível 3** corrige e repassa a solução para o **Suporte Nível 2**
8. **Suporte Nível 2** valida a correção e comunica ao **Suporte Nível 1** (Caso solução não seja aprovada, retorna no passo 6)
9. **Suporte Nível 1** comunica ao solicitante sobre a correção do problema
10. Se o problema foi resolvido, o chamado é fechado, caso contrário, retorna no passo 1.
[](https://kb.ufla.br/uploads/images/gallery/2024-09/QQ1v3reQ4gkiOjwn-image-1727294361800.png)